Archive | Arts and Crafts RSS feed for this section

Heart Watercolor Mosaic Paintings

31 Jan Heart Watercolor Mosaic Paintings- Paint free tissue paper paintings for inspired little minds at Go Running, Mama!

More heart fun at our house!  Baby Bird is all about making Valentines for people right now.  If she had it her way, art time in our home would be extended to a 10 hour daily paint and glitter fest until February 14th but sometimes I need a little break from all the mess.  Tissue paper painting satisfies Bird’s desire to paint without making a huge mess or necessitating a trip to the craft store to purchase special supplies.  Plus, the end result looks far fancier than you could ever imagine!

Heart Watercolor Mosaic Paintings- Paint free tissue paper paintings for inspired little minds at Go Running, Mama!

I guarantee you have all of the materials for this one floating around your house already: printer paper, parchment paper, scissors, a paintbrush, and colored tissue paper squares.  Whenever we are given a gift with tissue paper inside, I stash it away and cut it down into squares for craft projects galore!

Heart Watercolor Mosaic Paintings- Paint free tissue paper paintings for inspired little minds at Go Running, Mama!

Cut a heart stencil from the parchment paper.  Depending on how heavy handed your kiddo is with water and paint, you might want to cut several heart stencils as overly saturated parchment paper has a tendency to roll up which would be a problem if you want to make multiple heart paintings.

Heart Watercolor Mosaic Paintings- Paint free tissue paper paintings for inspired little minds at Go Running, Mama!

Lay a piece of printer paper over a placemat and cover with the heart stencil.  Anchor the stencil (we use awesome triangle crayons).

Heart Watercolor Mosaic Paintings- Paint free tissue paper paintings for inspired little minds at Go Running, Mama!


Let your little layer tissue squares over the stencil and paint away with water.

Heart Watercolor Mosaic Paintings- Paint free tissue paper paintings for inspired little minds at Go Running, Mama!

Peel the squares from the paper- Baby Bird loves to help with this step and it’s excellent for her small motor skills.

Heart Watercolor Mosaic Paintings- Paint free tissue paper paintings for inspired little minds at Go Running, Mama!


Once you remove all of the tissue squares, pull up the stencil and lay out to dry.  Et voila!

Heart Watercolor Mosaic Paintings- Paint free tissue paper paintings for inspired little minds at Go Running, Mama!


Baby Bird decided to transition to a free form project after making several hearts.  Though she covered the entire page with squares, she only decided to paint a few.

Heart Watercolor Mosaic Paintings- Paint free tissue paper paintings for inspired little minds at Go Running, Mama!


She enjoyed inspecting her work in the light!

Heart Watercolor Mosaic Paintings- Paint free tissue paper paintings for inspired little minds at Go Running, Mama!


I’ve claimed one of the hearts as my own Valentine’s gift from my little sweetheart!

Heart Watercolor Mosaic Paintings- Paint free tissue paper paintings for inspired little minds at Go Running, Mama!


#BetterGoodThings: Healthy Kale Heart Pops

16 Jan Better Good Things: Healthy Kale Heart Pops from Go Running, Mama! A better Valentine's treat filled with kale, grains, and cherries!

Better Good Things: Healthy Kale Heart Pops from Go Running, Mama!  A better Valentine's treat filled with kale, grains, and cherries!

So there is this blogger in the Austin area that I’ve been following for about two years now who writes Food Good, Laundry Bad.  Her name is Evin.  And obviously you know right off the bat that she is pretty solid because, yes, food is really really good and frankly laundry stinks!

Evin and I are opposites.  The kind of opposites that matter for some reason before you have kids and you actually spend time neatly packaging “the sort of person” you are into a neat box as though it somehow makes life easier.  She’s a country gal; I’m about as urban as a Southern hippie can get y’all.  She swears openly in posts; I swear in the closet.  She hates pumpkins; I think pumpkin flavored everything is one of the best parts of fall (Plus, it’s nature’s appetite suppressant… good to know if you’re ever bitten by a Copperhead, prescribed Prednisone to fight your reaction, and are consumed by an unrighteous desire to eat all the things made from carbs.  All of them.  Ever.)  I’ve seen her rail against the perky, the matchy-patchy, the tragically hip, both the over and under informed, and the awkwardly cute (who rightfully need railing against at times because… seriously) and as a former NFL cheerleader turned yogini foodie yupster I’m pretty sure I fall pretty squarely within one of those categories… or many… but I probably deserve some railing against as well in my Moonbeamesque Causehead moments (PCU reference, for the win!)

Basically, as Evin managed to so simply express it via email to me, she is the Duck Dynasty to my Portlandia.

Verrry different programing.

But a funny thing happens when you become a parent.  All of those things that don’t really matter about who you really are start to not really matter when evaluating who someone else is as well.  As a mom, I have plenty in common with Evin.  The most important things.  Compassion.  Love.  Family.

And we both like to prepare and eat really great food.

More than that, we both feel convicted to feed our families the best quality food our budgets allow in the manner that best suits their individual needs.  (So I guess we are both railing against the FDA and Monsanto.)

Evin is dairy free for part of her family and has banished artificial food dyes from her home.  Additionally, as someone who has lost 180 lbs since 2006 (that’s hero worthy stuff right there) she is focused on trying to keep things healthy and unprocessed without having to drive into Austin for unconventional ingredients that are prohibitively costly compared to mass market processed junk that is readily available.  If you don’t know my story, I’m a vegetarian turned carnivore turned raw vegan turned accidental omnivore turned struggling locavore.  Our house is soy, peanut, GMO, and HFC free. We go organic when financially viable, and dye free as much as possible.  We strive to support our local farmers and ranchers.  And we keep things nutrient dense (because I’m feeding a future olympian and a future CEO- you decide which is which).

Together we made a plan to take a kitchen adventure each month to “better up” something our families found to be desirably good things in ways that better meet their nutritional needs without having to spend more than $5 on ingredients we don’t normally stock in our own kitchens. With that, Better Good Things was born.  We’ll be sharing our experiences the Third Thursday of every month which will seriously challenge my inconsistent habit of writing on whim.

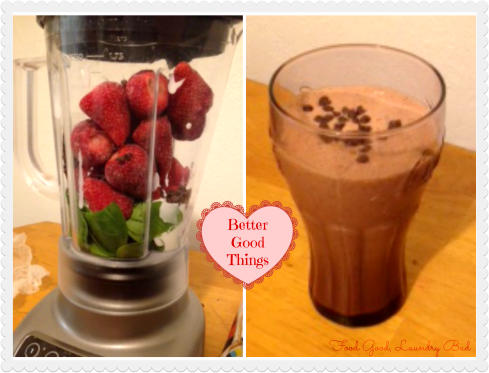
This month, with health vacuum of Valentine’s Day celebrations looming ominously in the coming month, we decided to tackle sweetheart treats to provide some better options for our little ones to snack on and share this holiday.  Evin went with this Chocolate Covered Strawberry Smoothie

Chocolate Covered Strawberry Smoothies- Better Good Things

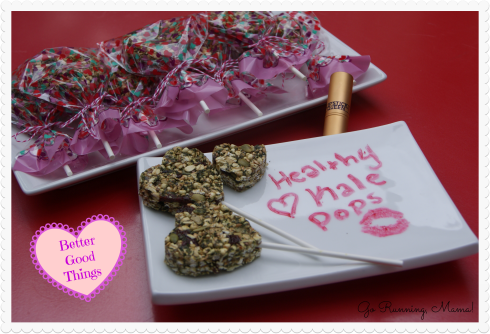
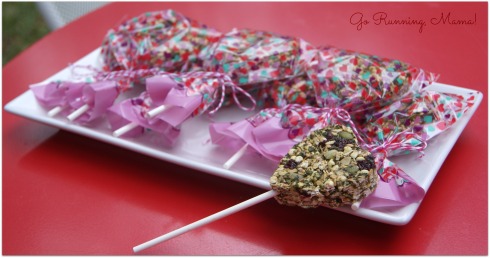
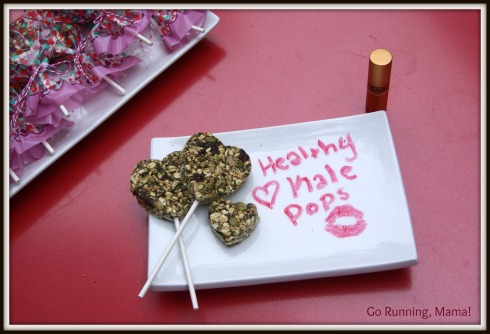
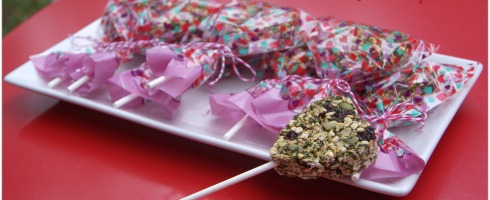
and I created  Healthy Kale Heart Pops.

Pick your poison.

And enjoy!

 Better Good Things: Healthy Kale Heart Pops from Go Running, Mama!  A better Valentine's treat filled with kale, grains, and cherries!

Here’s a little more about how I landed on making Healthy Kale Heart Pops…

About six months ago I discovered a cookbook filled with homemade energy bar recipes- Power Hungry by Camila Saulsbury. Camila also has a blog- by the same name- which is super awesome because fabulous food bloggers are really helping me to keep my cookbook purchasing in check by making their creations easily accessible online but when I find a cookbook that is really something special I like to own it to indulge in the cathartic experience of dogearring, thumbing, and page annotating.  And this one is certainly something special! It’s like someone followed my family around to see what we like doing and the sat down to make recipes that would specifically support our frequently snacking, high energy, healthy, on-to-go, gotta run tendencies with no complaints.

Just as any good home cook will do, I adapt even the finest tuned test kitchen recipe to better meet the specific taste of my family (oh the page annotations!) which is what I’ve don’t with the Crispy Kale Bars from Power Hungry that have morphed into my Healthy Kale Heart Pops.

One of the things I love about Power Hungry is that the recipes rely on ingredients that exist natively in my hippielala kitchen.  In sticking with mine and Evin’s pact, I knew I had to work with things I normally have on hand and spend $5 or under on special additions- I needed lollypop sticks ($1.50) and puffed millet  cereal (which I far prefer to puffed rice, $2.49)… $1.09 to spare!

Better Good Things: Healthy Kale Heart Pops from Go Running, Mama!  A better Valentine's treat filled with kale, grains, and cherries!

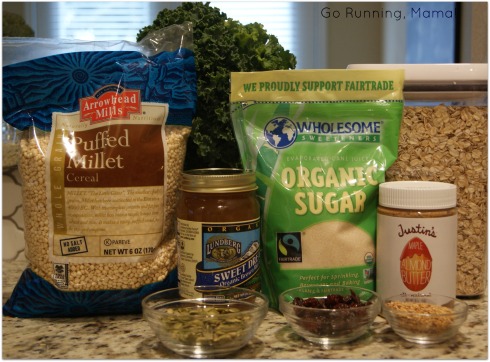
Pretty basic stock ingredients for a yupster kitchen.

Now here’s the true true on this one… please don’t try to pass it off as a lollypop.  It just wont work.  These are totally delicious but they taste nothing like high fructose corn syrup laden bulk treats (thank goodness) and if you’re little one is used to that and you try to pass this off as “the same thing” then everyone is in for disappointment.  Healthy choices start with healthy conversations with honest and positive positioning!

Because, for goodness sake, they obviously contain a green veggie!  And that is a good thing.

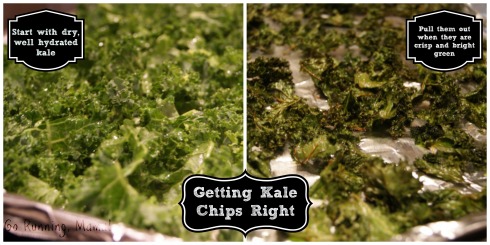
Preparing the kale is one of the most important parts of getting this right.  You need to start with fresh, dry kale or else your kale chips end up wrinkled, wilted and sad.  I find that rinsing my kale the night before so it can dry thoroughly and then putting it in a vase the night before ensures it is properly hydrated and full- we’re going back to fourth grade biology, y’all… making sure those vacuoles are full so that the cell walls don’t collapse!

Better Good Things: Healthy Kale Heart Pops from Go Running, Mama!  A better Valentine's treat filled with kale, grains, and cherries!

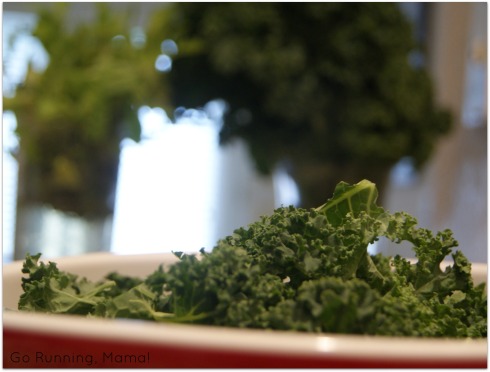
Kale is just gorgeous. In the background? Yep, those are my veggies that make up my “flower arrangements.”

Prepare the kale by cutting it off of the tough ribs and tear it into small pieces then arrange it on a baking sheet to dehydrate fully.  The baking/dehydrating is the second key kale step- you want it completely crisp but not terribly browned.  Kale chips are high art!  This method makes fool proof seasoned kale chips as well- just modify by adding the seasonings of your choice.

Better Good Things: Healthy Kale Heart Pops from Go Running, Mama!  A better Valentine's treat filled with kale, grains, and cherries!

While your amazingly perfect (seasoning free) kale chips are cooling, toast the grains and then mix with the dried sour cherries and millet cereal.  And here comes the fun part…

 Better Good Things: Healthy Kale Heart Pops from Go Running, Mama!  A better Valentine's treat filled with kale, grains, and cherries!

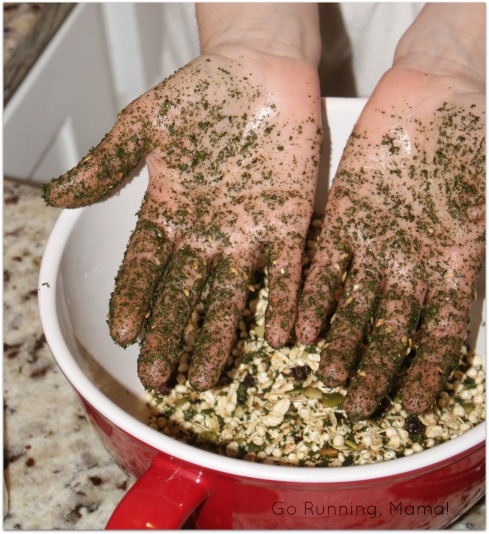
KALE HANDS!  It’s a great activity for the little ones if they aren’t running around in the nude banging cymbals and singing the Little Einsteins theme song.  Dehydrated kale basically crumbles into kale powder which allows you to easy pull out any remaining tough stems. Stir gently to combine.

 Better Good Things: Healthy Kale Heart Pops from Go Running, Mama!  A better Valentine's treat filled with kale, grains, and cherries!

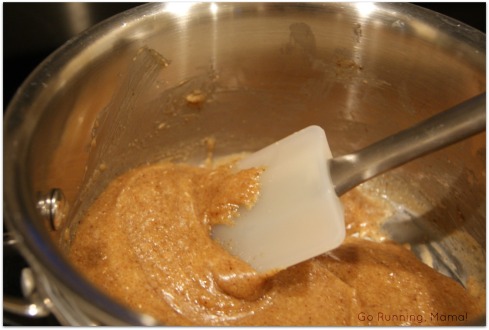
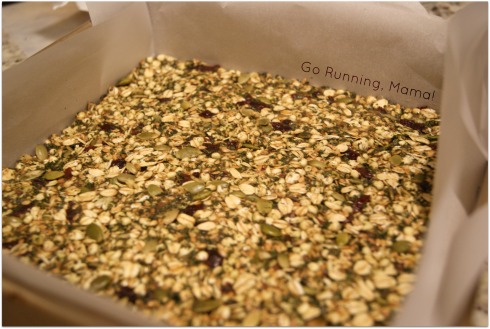
After combining the liquid ingredients on the stove and mixing them with the dry, press them into a prepared baking pan and compact them very firmly.  Pop ’em in the fridge to set so that they hold their shape when you cut them.

 Better Good Things: Healthy Kale Heart Pops from Go Running, Mama!  A better Valentine's treat filled with kale, grains, and cherries!

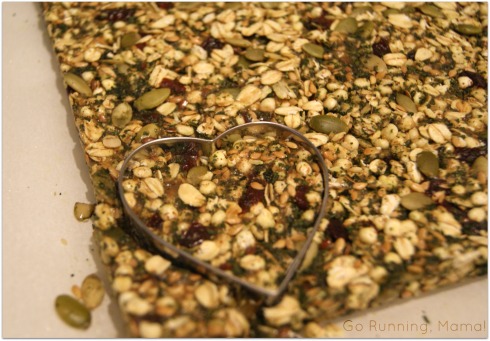
Remove from fridge and lift out of the pan, using the parchment liner, onto a cutting board.  Cutting the shapes with a cookie cutter uses some decent muscle if you’ve compressed the mixture well.  I like to place a small cutting board on top of my cookie cutter so I can really lay my weight on it without cutting hearts into my hands!

 Better Good Things: Healthy Kale Heart Pops from Go Running, Mama!  A better Valentine's treat filled with kale, grains, and cherries!

Because the mixture is tightly compacted (as you’ll realize when you tackle the heart shapes), trying to insert  a lollypop stick would just cause it to crumble.  Using metal barbecue skewer gives you a solid starting point.

 Better Good Things: Healthy Kale Heart Pops from Go Running, Mama!  A better Valentine's treat filled with kale, grains, and cherries!

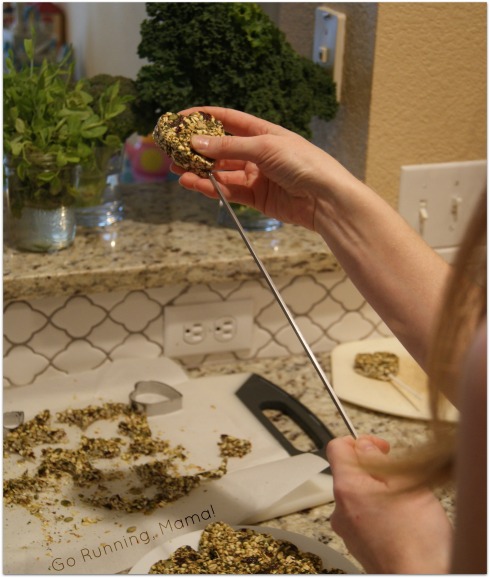
From that point, it’s super simple to add the lollypop sticks and wrap it all up!

 Better Good Things: Healthy Kale Heart Pops from Go Running, Mama!  A better Valentine's treat filled with kale, grains, and cherries!

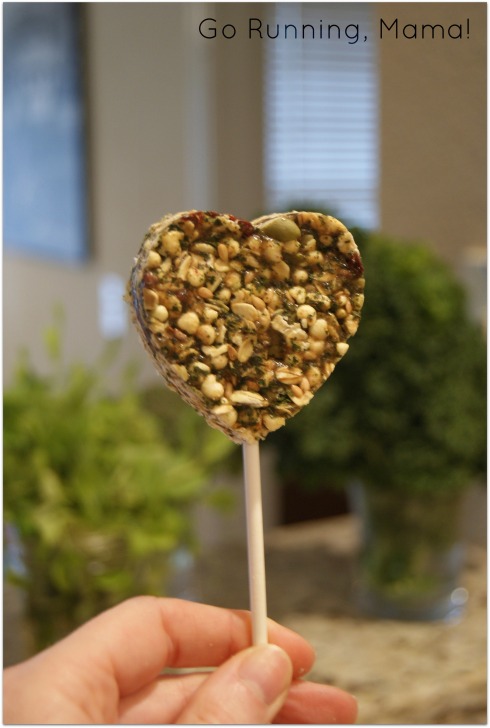
Et voila!  Eat your heart out, y’all!

 Better Good Things: Healthy Kale Heart Pops from Go Running, Mama!  A better Valentine's treat filled with kale, grains, and cherries!

Healthy Kale Heart Pops

Ingredients

  • 1 large bunch of curly leaf kale, stems removed and torn into small pieces
  • 1 tbs olive oil + more for pan
  • 1 cup rolled oats
  • 1/3 cup raw pepitas
  • 3 tbs flax seeds
  • 1 cup unsweetened puffed millet cereal
  • 1/3 cup dried sour cherries, coarsely chopped
  • 1/3 cup almond butter (I used Justin’s Maple Almond)
  • 1/4 cup organic sugar
  • 1/4 cup organic brown rice syrup
  • 1/4 tsp fine sea salt
  • generous 1/4 tsp cinnamon
  • 1/4 tsp vanilla bean paste
  • 1/4 tsp almond extract

Directions:

Preheat oven to 350 degrees F.

Prepare the kale to bake. Rinse and dry very well. Cut leaves from stem and tear into small pieces.  Toss kale pieces with with olive oil and spread into a single layer across a baking sheet.

Reduce oven temperature to 300 degrees F and bake the kale for 15 minutes.  Toss kale, rotate, and return to oven for 12 more minutes.  Check the kale for dehydrated crispness before removing from the oven.  Return from oven for one to two minutes if needed, watching carefully, to ensure they are crisp but not browned.  Gently remove to a bowl to cool completely.

Return oven temperature to 350 degrees F.

Line an 8-inch baking pan with parchment paper covering the bottom and sides and treat with olive oil.

Spread the oats, pepitas, and flax seeds on the baking sheet lined with new parchment or foil and toast in the oven for 5 minutes, shaking halfway through, until fragrant.  Transfer to a large bowl and combine with the cereal and cherries.

Using your bare hands, crumble the cooled kale leaves into the bowl, picking to remove any fibrous stems that may have remained.  Gently stir to combine ingredients.

Combine the almond butter, sugar, salt, cinnamon, and vanilla bean paste in a small saucepan and heat over medium low, stirring frequently.  Heat 5-8 minutes until sugar has dissolved and mixture begins to bubble.  Remove from heat and stir in almond extract.

Immediately pour into the oat mixture and mix with a spatula until well coated.

Pour the mixture into the prepared pan.  Press the mixture into the pan to spread into an even layer.  Flatten and firmly compact the mixture.

Refrigerate for at least an hour until firmly set.

Remove from fridge and lift out of the pan, using the parchment liner, onto a cutting board.  Using a 3-inch diameter heart cookie cutter, cut into heart shapes.

Using a metal barbecue skewer, poke a hole in the base of each heart.  Using the skewer hole as a guide, insert lollypop stick.

Makes approximately 15 heart pops.

Top 13 in 2013

2 Jan My 5 Favorite Posts of 2013- Go Running, Mama!

This blog has been a new adventure for me and, even though it only covered the second half of the year, I thought it would be interesting to take a look back at my 13 most popular posts of 2013.

It’s been a lot of fun sharing, and I’m excited about another year with y’all!

Top 13 posts in 2013- Go Running, Mama!

13. Exhaustion, Smoothie Pick Me Ups, and a Virtual Half Marathon Comedy of Errors (September)- Forgetting water during a high altitude half marathon, finding out I had mono, and the smoothies that got me through the ordeal!

12. Carrot Top Tacos (July)- Spiced carrots and beans with carrot top chimichurri.  Never, ever waste your carrot tops again.

11. Maple Bacon Biscuits (September)-  Maple.  Bacon. Biscuit.  Trifecta.

10. Gifts from the Heart: Apple Cinnamon Ornaments (December)- An ultra non-toxic clay that makes heavenly scented ornaments or an amazing material for sensory play.

9.  #FirstontheFirst Spiced Pumpkin Cake with Penuche Frosting (October)- We were supposed to make candy, but I cheated and frosted a very yummy cake with this praline-esque frosting.

8. #FirstontheFirst Gateau Larsson (September)- My Scandinavian twist on a traditional Basque dessert.

7.  Gifts from the Heart: Baking Soda Clay Ornaments (December)- These smooth ornaments are an inexpensive (and toddler friendly) alternative to a trip to a ceramics studio.

6. Creamy Garlic Kefir Pasta (July)- A probiotic packed easy meal.

5. Cinnamon Quinoa Lunchbox Bars (August)- Lunchbox snacks don’t get much healthier.

4. Meeska… Mooska… Mouseka Cakes: Zucchini Quinoa Lunchbox Patties (August)- Healthy food tastes even better in Mickey Mouse form.

3. #FirstontheFirst Candy Canes for Cheaters (December)- Once again, we were supposed to make candy.  And I didn’t.  But I think you’ll forgive me when you taste these cookies.

2. Frosty the Cheese Man: Snowman Cheese Ball with Hand Cut Tortilla Chips (December)- The most adorable, toddler friendly appetizer you’ll ever bring to a gathering.

1. Gifts from the Heart: Homemade Ornaments– Salt dough ornaments are a classic go-to holiday activity.

Looking for even more fun?  Here are my five favorite posts you may have missed this year…

My 5 Favorite Posts of 2013- Go Running, Mama!

Gifts from the Heart: Baking Soda Clay Ornaments

17 Dec Gifts from the Heart: Smooth Baking Soda Ornaments (A homemade alternative to going to the ceramics studio)- Go Running, Mama!

Gifts from the Heart: Smooth Baking Soda Ornaments (A homemade alternative to going to the ceramics studio)- Go Running, Mama!

Looking for even more ornament ideas?  Check out our Salt Dough Ornaments and Cinnamon Clay Ornaments!

I’m pretty close to breathing a a sigh of relief because we’ve almost completed all of our homemade gifts for this year.  I grew up with a mom who could command salt dough to do some pretty spectacular things, so that’s what we’ve used for our homemade ornaments in the past.  There are a couple of challenges with salt dough though- it takes forever to dry completely so you can paint and varnish and the surface isn’t completely smooth which gives it an adorable, shabby appearance but makes it hard for a little one to decorate with anything other than a paintbrush.

This year we were getting a later start and we also wanted to get started with our gift ornaments with some other playgroup friends during what Baby Bird referred to as her “ornament play party” so I decided that we would switch to baking soda clay for this year.  Baking soda clay bakes to dry much quicker than salt dough and dries with a perfectly smooth finish- my beautiful friend Kristin who joined us with her son for ornament creation pointed out that they looked and felt exactly like the ornaments available at the ceramics studio she and I have visited with our kiddos in the past.  She is right- they have a smooth, non-porous finish with a light sheen from the baking soda that makes them look special even without decorating.

The best part is they can be decorated with crayons and markers should you choose to keep the paint packed away.  You could even toss a few dried ornaments and markers into a ziplock bag in your purse to tote along for moments when your little one needs a fun activity if you are in a waiting room or stuck in traffic.  Baby Bird and I packed up a few with some markers to deliver to the porch of a friend with a sick kiddo who had been stuck at home for a few days.  There is nothing better than a virtual playdate delivery!

Gifts from the Heart: Smooth Baking Soda Ornaments (A homemade alternative to going to the ceramics studio)- Go Running, Mama!

The night before our “ornament play party” I made a batch of baking soda clay and Baby Bird and I cut lots of fun ornament shapes with our cookie cutters.  I baked them that evening so the kids would have an activity to work on while I made fresh clay for the kiddo’s handprint ornaments.

The precut, baked ornaments were a big hit and kept little hands very busy.  So busy, in fact, that I ended up sending the baking soda clay I made for handprint ornaments home with my mama friends…so I’ve been on the hook to provide step by step instructions for just what to do with that bag of clay I sent home!

Gifts from the Heart: Smooth Baking Soda Ornaments (A homemade alternative to going to the ceramics studio)- Go Running, Mama!

As you can see, Baby Bird is on a monochromatic kick.

This year I decided I’d like to give handprint reindeer and fingerprint Christmas trees since it has been two years since made anything that included Baby Bird’s fingerprints.  Instead of doing relief  handprints for a second year in a row, I opted for cutting a stencil of Bird’s hand to use for the reindeer.

Gifts from the Heart: Smooth Baking Soda Ornaments (A homemade alternative to going to the ceramics studio)- Go Running, Mama!

I moved the cut shapes to a baking sheet lined in parchment and had Baby Bird make little fingerprint indentions on the trees-pinky finger at the top down to thumb at the bottom.  Then into the oven!

Gifts from the Heart: Smooth Baking Soda Ornaments (A homemade alternative to going to the ceramics studio)- Go Running, Mama!

I started with the trees since I knew they would be my most time consuming project.  I’ve discovered that things turn out better when you paint the edges of your ornaments first.  Otherwise, you end up with a slightly noticeable border on the face of your ornament.

Gifts from the Heart: Smooth Baking Soda Ornaments (A homemade alternative to going to the ceramics studio)- Go Running, Mama!

Once the trees were painted and dry, I primed the fingerprint reliefs with white paint I applied wit a cotton swab so that Baby Bird’s fingerprints would really stand out.

Gifts from the Heart: Smooth Baking Soda Ornaments (A homemade alternative to going to the ceramics studio)- Go Running, Mama!

I let Baby Bird select the colors we would use for each fingerprint and made sure we had wipes close at hand before we started adding colored fingerprints to the tree.  Two things to know- 1) there WILL be mess when you paint on a toddler hand so prepare for it and 2) you have to work at the speed of light to ensure your tiny artist doesn’t grow weary of the project in the middle!  So be prepared.

Gifts from the Heart: Smooth Baking Soda Ornaments (A homemade alternative to going to the ceramics studio)- Go Running, Mama!

We worked finger by finger down the trees- we first did all the pinky finger marks on our trees and worked out way down… much easier that doing each tree separately.  Though it took considerable guiding to ensure Baby Bird’s prints made it in each proper place, she had a blast yelling “Smooosh” each time she squished her finger into the indention and left a print.  Oh, how that girl loves to smoosh.

Gifts from the Heart: Smooth Baking Soda Ornaments (A homemade alternative to going to the ceramics studio)- Go Running, Mama!

When I decided on fingerprint trees, I hadn’t quite decided if the fingerprints should represent ornaments or lights.  Once all the color had been applied, the fingerprinted trees looked adorable but they just didn’t feel complete…

Gifts from the Heart: Smooth Baking Soda Ornaments (A homemade alternative to going to the ceramics studio)- Go Running, Mama!

So I added a “string” to make fingerprint lights which felt much better!

Once they were dry, I hung them from a drying rack outside and sprayed them with a coat of low gloss acrylic sealer.

Gifts from the Heart: Smooth Baking Soda Ornaments (A homemade alternative to going to the ceramics studio)- Go Running, Mama!

While the trees dried, I move on to the reindeer handprints which were insanely simple by comparison.

Paint the handprints brown.

Seriously.  That’s it.

Gifts from the Heart: Smooth Baking Soda Ornaments (A homemade alternative to going to the ceramics studio)- Go Running, Mama!

Once the paint is dry, spray them with a sealer and apply eyes, a nose, and a bow.

Done.  Wham, bam, Happy Holidays Ma’am!

Gifts from the Heart: Smooth Baking Soda Ornaments (A homemade alternative to going to the ceramics studio)- Go Running, Mama!

I love that they feel totally different from the Santas and Penguins with gave as gifts last year, but are every bit as homespun and heartfelt!  Between these, the cinnamon clay ornaments, and the reindeer tea towels we have in progress we now have holiday gifting from the toddler locked down. Such a nice feeling.

Gifts from the Heart: Smooth Baking Soda Ornaments (A homemade alternative to going to the ceramics studio)- Go Running, Mama!

Baking Soda Clay

Ingredients:

  • 2 cups baking soda
  • 1 cup cornstarch
  • 1 1/3 cups cold water
  • 1 tbs cooking oil (I use olive or grapeseed since we don’t keep canola or mixed vegetable oil in the house)

Directions:  Whisk baking soda and cornstarch together in a medium sized saucepan.  Add liquids together and slowly whisk into dry ingredients.

Place saucepan on a burner at med/med-high heat and stir frequently with a silicone spoon/spatula.  Mixture will boil and then begin form clumps- once you see the first bubbles reach the surface of the mixture, move from stirring frequently to constantly, scraping the bottom of the pan as you go.  Mixture will soon form a thick mass that holds its shape and will be the consistency of slightly dry mashed potatoes.

Turn mixture out into a glass bowl and cover with a damp kitchen towel to cool slightly.  Once cool to the touch, turn out onto parchment and knead until very smooth.

Preheat oven to 175 degrees F.

On parchment lightly dusted with cornstarch, roll out dough to a thickness between 1/4- 1/2 inch.  Less than 1/4 inch thick will cause cracking and breakage during the drying process.

Cut dough into desired shapes.  Transfer to parchment lined baking sheet.

Bake in oven for 90 minutes, rotate sheet and flip ornaments, and return to oven for 30 minutes more.

Once dry and cool paint, decorate, and varnish as desired. If painting a more detailed design, brush ornaments with a damp sponge before painting to allow better paint manipulation as paint adsorbs quickly.

Gifts from the Heart (Quick and Easy Edition): Cinnamon Apple Clay Ornaments

16 Dec Gifts from the Heart: Super Simple Cinnamon Clay Ornaments (No painting or varnishing actually required!)- Go Running, Mama!

Gifts from the Heart: Super Simple Cinnamon Clay Ornaments (No painting or varnishing actually required!)- Go Running, Mama!

Looking for even more ornament ideas?  Check out our Salt Dough Ornaments and Cinnamon Clay Ornaments!

Friday morning- the day after hosting what Baby Bird referred to as her “ornament play party” at our house- we had play plans with my good friend Laura and her daughters.  It was actually our turn to host Laura and her girls, but since she has an infant it just feels easier for her when we are on her home turf… but I’m not one to shirk my hostessing duties (especially for a mom with an infant) so we offered to bring lunch and the activity along with us so she didn’t have to think about it. Since we’re on a homemade gift making binge at our home, I offered to make some cinnamon clay to bring along so the girls could make some gifts.

We’re on a roll with ornament creation at our house because ornaments make awesome, heartfelt seasonal gifts for loved ones from the littles.  Laura and I have similar parenting styles, so I knew that she too would be into a little homemade gift making time, but I didn’t want to invade her home with the level of mess that accompanies most ornament projects so i decided that cinnamon clay was the right choice for two specific reasons- cinnamon clay requires no real additional painting or sealing and it makes your home smell amazing when baking them in the oven which is a great value add for an activity you tote to a friends house.

I like to keep our cinnamon clay nontoxic and foodsafe, so I leave out the white craft glue that many recipes add.  Ours is simply equal parts cinnamon and applesauce plus the addition of ground clove and nutmeg.  My Cuisinart Mini Prep makes quick work of mixing it up and then it only requires a few minutes of extra hand kneading to get the feel for the correct consistency.

Gifts from the Heart: Super Simple Cinnamon Clay Ornaments (No painting or varnishing actually required!)- Go Running, Mama!

Roll it our between 1/4-1/2 inch thickness and then all that is required is some cookie cutters and a straw to poke the hole for the string.  This makes a pretty easy project to give the kiddos free reign in design once things are rolled out since I don’t have to worry about depth of handprints or perfect paint jobs later on.  Baby Bird has developed a habit of making light patterns in the dough with her cookie cutters before actually cutting a shape which makes for an end design with a visually interesting texture- obviously a young van Gogh in the making.

Gifts from the Heart: Super Simple Cinnamon Clay Ornaments (No painting or varnishing actually required!)- Go Running, Mama!

You see the photos flanking this text?  That you are witnessing here is some very serious toddler art discussion time!  Though “I am making a BIG snowman!” “Well, I am making one teeny!” might not sound all that profound, but it’s something pretty major when you consider that it shows thoughtful comparison and evaluation of a peer’s work.  Toddlers are amazing little creatures!

Gifts from the Heart: Super Simple Cinnamon Clay Ornaments (No painting or varnishing actually required!)- Go Running, Mama!

Really and truly, all you have to do it transfer the cut shapes to a cookie sheet lined in parchment, punch ribbon holes with a straw, bake them in the oven (heed my ornament flipping instructions in the directions- these little suckers like to try to curl up on ou!), and call it a day while your house smells like heaven. Tie a cute ribbon around them, hang them on the tree near the lights or as a finial on a lamp et viola!  A fantastic smelling, super easy, toddler generated creation.

Gifts from the Heart: Super Simple Cinnamon Clay Ornaments (No painting or varnishing actually required!)- Go Running, Mama!

But if you get the itch to over-achieve, you can get out the fabric paint (isn’t everyone channeling 1987 at their house with a healthy stash of puff paint?) and paint a little cookie border.  Gold star for the extra effort!

Even with that little addition, these are still the quickest and easiest baked ornament craft we create at our house.  Hooray for that!

Gifts from the Heart: Super Simple Cinnamon Clay Ornaments (No painting or varnishing actually required!)- Go Running, Mama!

Cinnamon Clay Ornaments

Ingredients:

  • 1 cup sugar free apple sauce (not chunky)
  • 1 cup cinnamon
  • 1/2 tbs ground clove
  • 1/2 tbs ground nutmeg

Directions: Preheat oven to 175 degrees F.

Combine all ingredients in a food processor (a Cuisinart Mini Prep does the trick perfectly!) and pulse to combine.  Turn out onto parchment generously dusted with cinnamon and knead with cinnamon dusted hands.  If mixture is slightly sticky, knead in more cinnamon, cloves, or nutmeg to your personal preference.  Knead until clay dough is smooth and elastic but no longer actively sticky.

Roll out between two sheets of parchment dusted with cinnamon.  For best results, roll dough between 1/2 inch and 1/4 inch thickness- the thicker the ornament, the longer the dry time but the less curling.  Use cookie cutters to cut designs and a straw to punch a hole for ribbon.

Remove shapes to a cookie sheet lined in parchment and reroll the remaining dough to cut additional ornaments.

Bake at 175 in 30 minute increments, flipping ornaments every half hour.  Bake time to dry will take between 1 1/2- 2 1/2 hours, depending on thickness of the ornaments.

Gifts from the Heart: Helping Hand Heart Cookies

15 Dec Gifts from the Heart: Helping Hands Heart Cookies- A great edible gift using your little's handprint and artistry at Go Running, Mama!

Gifts from the Heart: Helping Hands Heart Cookies- A great edible gift using your little's handprint and artistry at Go Running, Mama!

We’ve got hearts and hands on the brain at our house right now.  Baby Bird and I send lots of time talking about feelings and sharing affirmations, and it seems that hands and hearts are frequently in the rotation.

“I like your gentle hands… thank you for your caring heart… I’m glad I had your helping hands around… I appreciate your kind heart.”

These are good times, my friends.

It also makes it extra special to make our favorite cookie gifts for the helping hands in our lives since Baby Bird is becoming  hyper-aware of how kindness and helping affect her day and the lives of those around her.  Dance teachers, tutors, neighbors, and the nice ladies that give her big hugs at Daddy’s office- kindness deserves to be recognized and affirmed.

When making gifts I like Baby Bird to be as involved as possible in each step, and cookies are a pretty perfect way to engage her because she can contribute to each step.

I pre-measure all of our ingredients and let her add them to the bowl.  With a little help, she’s a great whisker too!  I even let her run the final pass of the rolling pin when rolling out our cookie dough.

And of course, her hand print creates the cookie shape for this gift.  I create a stencil of her hand and then hand cut the cookies from the dough with a knife.

Gifts from the Heart: Helping Hands Heart Cookies- A great edible gift using your little's handprint and artistry at Go Running, Mama!

I also create a heart outline stencil.  Once I’ve cut the cookies I lay the stencil over each one, paint the interior of the stencil with an egg wash, and let Baby Bird sprinkle the stencil with colored sugar.

Gifts from the Heart: Helping Hands Heart Cookies- A great edible gift using your little's handprint and artistry at Go Running, Mama!

We let the cookies cool completely on a rack… which is normally when Baby Bird volunteers to “help” taste them.

Gifts from the Heart: Helping Hands Heart Cookies- A great edible gift using your little's handprint and artistry at Go Running, Mama!

Once they are cool, Baby Bird gets to decorate the cookies with cookie markers all by herself!  She is always so proud of this part because she gets complete creative control.  And she always snaps a few “fingers” along the way, so I’ve learned to make about half a dozen more cookies than we need.

Gifts from the Heart: Helping Hands Heart Cookies- A great edible gift using your little's handprint and artistry at Go Running, Mama!

The end result is beautiful in a way that only gifts made by a toddler can be- so sweet!

Gifts from the Heart: Helping Hands Heart Cookies- A great edible gift using your little's handprint and artistry at Go Running, Mama!

Then we bundle up a pair of hands (right and left!) and attach a note thanking our special friends for their helping hands!  It makes a great gift for people who aren’t close enough to us to truly want a toddler made craft to hang on the tree or display in their home- but who would probably do so out of politeness- but who deserve a heartfelt gift for the way they contribute to our lives.

Gifts from the Heart: Helping Hands Heart Cookies- A great edible gift using your little's handprint and artistry at Go Running, Mama!

Helping Hand Sugar Cookies with Sanding Sugar Hearts

  • 2 cups all-purpose flour (plus some additional for rolling)
  • 1/2 tsp baking powder
  • 1/4 tsp sea salt
  • 1/2 cup unsalted butter, room temperature
  • 1 cup sugar
  • 1 large egg + 1 egg yolk for egg wash
  • 1 tsp vanilla extract
  • colored sanding sugar

Directions:  In a large bowl, whisk together flour, baking powder, and salt.

In the bowl of a stand mixer, beat together sugar and butter until light and fluffy.  Beat in 1 whole egg and vanilla.  With mixer on low, slowly add the flour mixture and beat until combined.

Divide dough in half and flatten into disks.  Wrap each disk in plastic wrap and freeze for about 20 minutes to firm.

Preheat oven to 325 degrees F.

Remove one disk of dough and let stand 5 minutes.  Roll dough 1/8-1/4 inch thickness.  Cut handprints by hand or using a cookie cutter.  Carefully transfer handprints to a parchment lined baking sheet and place in freezer for 8-12minutes.

Combine egg yolk with 1 tbs water to make an egg wash.

Remove from freezer, place heart stencil over each cookie, paint with egg wash, and sprinkle on colored sanding sugar.

Bake for 8-15 minutes depending on handprint size and thickness.

Allow to cool on baking sheet for 3 minutes and then transfer to cooling rack using a spatula.

Repeat with remaining dough.

Frosty the Cheese Man: Snowman Cheese Ball with Hand Cut Holiday Tortilla Chips

4 Dec Frosty the Cheese Man: A Snowman Cheese Ball- Go Running, Mama!

Frosty the Cheese Man: A Snowman Cheese Ball- Go Running, Mama!

It’s holiday playdate time again… that time of year when, all of a sudden, the usual tub of hummus and veggie snacks I pack for our playdate crew doesn’t seem quite fancy enough. Holiday’s call for something festive!  Toddler festive, that is.

Wait.  Let’s stop so I can clarify… I’m not in a playdate circle with a bunch of jerky moms who have lofty and unreasonable expectations about what people should contribute during the holidays.  I’m not up late at night stressing about how I’m going to impress others and hold onto my station as not-quite-Martha-on-the-verge-of-sanity.  The desire for something fancy and festive is purely my own- a self imposed joy amplifier to help spread a little extra happy during any season celebrated with a Peanuts holiday special.

Good.  I’m glad we cleared that up.

If I’ve learned anything as a mom, nothing screams holiday celebration for littles in quite the same way as food shaped like seasonal stuff.

Oranges?  Okay.  Oranges decorated like jack-o-lanterns?  OMG!

Fruit salad? Respectable work.  Fruit salad shaped like an American flag? Amazingness!

And here is my secret weapon…

Cheese ball and crackers? Tasty but a little 1950’s.  Cheese ball shaped like anything accompanied by home-baked tortilla chips in fun shapes? Totally swoon-worthy… and adorably retro-chic!

The real deal is that cheese balls are easy, economical, easy to customize flavor wise- and even easier to make into shapes (I just used “easy” four times!  Do you believe me yet?).  And a quality, fresh flour tortilla makes a killer home-baked tortilla chip that will please any toddler.  Which is why these two make up my favorite festive snack pairing… especially when you can shape them like a snowman!

Because seriously… how cute is this guy!?

Frosty the Cheese Man: A Snowman Cheese Ball- Go Running, Mama!

Even without his carrot nose, this fella is dashing!

He’s ridiculously cute, right!?

But, the thing that really elevated this from a festive cheese ball to a pile of holiday happiness on a plate is the hand cut home-baked festive tortilla chips.  That are beyond simple.  And- it just keeps getting better- fabulously engaging for little helping hands!

Frosty the Cheese Man: A Snowman Cheese Ball- Go Running, Mama!

Baby Bird loves to select her shapes to punch her “own chippies” too!  It’s really adorable to listen to her say “Smoooosh!” each time she lays her weight into a cookie cutter to cut out a shape.  There is a part of me that hope she does that forever.  A BIG part of me.

Frosty the Cheese Man: A Snowman Cheese Ball- Go Running, Mama!

If you want to turn the tortilla chip creation into an active part of your playdate and an art project to boot, you can make egg wash paint and allow your lilliputian guests to paint their own chips!

Frosty the Cheese Man: A Snowman Cheese Ball- Go Running, Mama!

We love kitchen activities at playdates because I like to see kids taking an active role in creating their meals.  As a former junior high science teacher, I worked with far too many adolescents with dangerous misconceptions and a disheartening willing ignorance towards how food is sourced, created, and prepared.  I love seeing little ones take a food project they have created to the table with proud ownership.

Of course, I could be teaching Baby Bird that cheese comes from snowmen.

Being a toddler is confusing.

At least the snacks are tasty… and festive!

Snowman Cheese Ball with Hand Cut Tortilla Chips

Ingredients:

Cheese Ball:

  • 16 oz cream cheese
  • 8 oz shredded cheddar
  • 1/4 cup fresh chives, chopped
  • 1 tsp truffle oil
  • 1/4 tsp white pepper
  • 1 tsp garlic powder
  • 1/2 c grated Parmigiano-Reggiano cheese
  • 1/2 tsp truffle salt
  • whole peppercorns
  • 1 baby carrot
  • additional chives for scarf
  • 1 cinnamon stick (broken in two) for arms

Tortilla Chips:

  • fresh flour tortillas

Optional Egg Wash Paint (for each desired color):

  • 1 egg yolk
  • 1 tsp water
  • 2-3 drops food coloring

Directions: Mix first six cheese ball ingredients until blended. Refrigerate at least 1 hour.

Divide cheese mixture into 3 different-size balls (1 small, 1 medium and 1 large). In food processor, pulse grated parm with truffle salt. Coat each ball with Parmesan. Arrange in line on serving plate to resemble a snowman lying down.

Decorate with peppercorns, chives, cinnamon sticks and a carrot.  Refrigerate until a half hour before serving.

Preheat oven to 350 degrees F.

Using cookie cutters, cut tortillas into desired shapes.

If painting, mix egg wash paint ingredients and decorate shapes as desired.

Arrange shapes on a baking sheet lined with parchment paper.  Bake for 10-12 minutes.

Allow to cool on pan for 1 minute then transfer to a bowl to serve.

Gifts from the Heart: Homemade Ornaments

2 Dec Go Running, Mama! Homemade Salt Dough Ornaments- Easy, Inexpensive Homemade Gifts

Go Running, Mama! Homemade Salt Dough Ornaments- Easy, Inexpensive Homemade Gifts

Looking for more homemade ornament ideas?  Check out Baby Bird’s amazingly awesome Baking Soda Clay Ornaments and Cinnamon Clay Ornaments!


Baby Bird might be less than three years old, but we’ve helped her to establish the tradition of making homemade gifts for her loved ones (and she’s got a whole lotta people to love) each holiday season.  Last year we made salt dough ornaments with her hand and foot prints that turned out absolutely adorable.  I’m seriously sad I didn’t make a few extra for our tree!

A few days ago I got a text from another stay-at-home mama friend on a budget asking for the how-to on our salt dough ornament activity from last year, so it seemed like the perfect thing to share right here!

Salt dough is easy and inexpensive. It take a little muscle to knead it to the right consistency and a little more patience to get it to dry out fully before the painting stage, but the moderate effort required is well worth the absolutely precious outcome.  You’ll be hard pressed to find a more impressive gift project using items that exist in your pantry!

The first step is a simple one: Mix up a batch of salt dough in your stand mixer (recipe below).  You aren’t going to eat this one (although if your little one nibbles a corner during the creative process- it is non-toxic!) so you can mix like crazy without having to fear over-glutenizing the flour.

Go Running, Mama! Homemade Salt Dough Ornaments- Easy, Inexpensive Homemade Gifts

Once everything is well mixed, turn out the dough and knead it well.  Toddlers love to help with this step even though their assistance doesn’t really help.  Who cares!  Helping hands and working hands learning to care and assist at home.

Knead until smooth, then cover with a damp towel and let it rest for about a half an hour.

Go Running, Mama! Homemade Salt Dough Ornaments- Easy, Inexpensive Homemade Gifts

After the rest period, I rolled the dough out to about 1/2 inch thickness on floured parchment on a cookie sheet.  The cookie sheet is totally necessary if you’re going to do little feet and don’t want those feet on your counter.

To get the best hand and foot print impressions possible, I moved the tray to the ground and had Baby Bird step hard on each foot for a footprint or get down on the hands and knees and really lean into her hand print- salt dough can be resistant at times.

Once I had the basic impressions, I cut around them with a knife and removed the excess dough.

Then, I brought the tray down the the floor again and had Baby Bird lean into her prints one more time to make sure the impressions were set deeply into the dough.

I cut holes using a straw and then they were ready for the oven!

Go Running, Mama! Homemade Salt Dough Ornaments- Easy, Inexpensive Homemade Gifts

It’s important to make sure the ornaments are completely dry before you paint and seal them or they will never really dry out… and could get moldy. Ewwww! (Moldy ornament does not equal beloved gift)

After the first three hours, rotate the pan as needed and flip the ornaments if the back side doesn’t seem to be drying.  After turning off the oven, I just left mine in over night in the warmth of the oven to ensure they were completely dry.

Go Running, Mama! Homemade Salt Dough Ornaments- Easy, Inexpensive Homemade Gifts

The painting is the fun part!  I’m sure Baby BIrd would have loved to assist with this part, but I was keen on making penguins and Santas that really looked like penguins and Santas.  If the design isn’t the important element for you then let your little one dive in!

Go Running, Mama! Homemade Salt Dough Ornaments- Easy, Inexpensive Homemade Gifts

Footprints make ideal penguins and snowmen, while handprints are great Santas and reindeer.

Go Running, Mama! Homemade Salt Dough Ornaments- Easy, Inexpensive Homemade Gifts

Once painted, let your ornaments dry completely.  Don’t forget to paint the backs once the fronts are dry- ornaments have a tendency to spin around on a tree!

Go Running, Mama! Homemade Salt Dough Ornaments- Easy, Inexpensive Homemade Gifts

Once the paint is dry, hang your ornaments on a rack outside and give them a quick shot with an acrylic sealer to keep them looking lovely for years to come!

Go Running, Mama! Homemade Salt Dough Ornaments- Easy, Inexpensive Homemade Gifts

How happy do they look!? So happy.

Go Running, Mama! Homemade Salt Dough Ornaments- Easy, Inexpensive Homemade Gifts

Salt Dough- The Basics

Ingredients

  • 2 cups all-purpose flour
  • 1 cup table salt
  • 3/4 to 1 cup warm water

Directions: Preheat oven to 250 degrees F.

Combine all ingredients (beginning with only 3/4 cups water) in stand mixer and mix until completely incorporated.  Add more water- a teaspoon at a time- if needed.

Once fully incorporated, turn out onto waxed paper and knead until smooth.  If choosing to add food coloring, do so at this point by adding small amounts of gel coloring between each kneading.  Allow to rest about 30 minutes at room temperature, covered by a damp towel.

On lightly floured parchment, roll our dough to a thickness between 1/4- 1/2 inch.  Less than 1/4 inch thick will cause cracking and breakage during the drying process.

Cut dough into desired shapes.  Transfer to parchment lined baking sheet.

Bake in oven until dry 4-8 hours.  After the first 3 hours, check hourly for dryness.  Rotate the sheet and flip the ornaments as needed to ensure ornaments dry evenly and completely.

Once dry and cool, paint, decorate, and varnish as desired.