Tag Archives: on the go

#BetterGoodThings- Marathon Lasagna Rolls

28 Apr #BetterGoodThings: Marathon Lasagna Rolls- a healthier and easier lasagna with bison and cottage cheese

#BetterGoodThings: Marathon Lasagna Rolls- a healthier and easier lasagna with bison and cottage cheese


Yikes!  The disorganization of my mind is spilling directly over onto the blog.

Guess what day it isn’t?

It isn’t the third Thursday of the month.  That’s the day that Better Good Things is supposed to grace the headlines on the blog, but this month that day rolled by long ago in what was a haze of Boston Marathon prep for me (and STAAR test madness for Evin).  Just to be clear- that didn’t mean that I didn’t create and share this recipe with my family in time for my deadline… it just meant I forget about y’all.

*hangs head in shame and looks up with endearingly sad puppy-dog eyes*

I am sorry.  I’m the blogging equivalent of your super flakey friend this month.

You know the friend who always makes really ambitious, elaborate plans with you to go on a fabulous girls’ trip in the not-too-distant future and then becomes vaguely busy the closer the date grows?  Yeah.  That one.  (Which reminds me- I think I might be slightly committed to trips to both the Amalfi Coast and Vegas that I need to start side stepping out of pretty soon… because I’m totally busy… with things.)

For April, Evin and I chose to “better up” lasagna- a beloved favorite in many a kitchen- which launched us into a great philosophical debate.  Are we “easying up” healthy things or “healthying up” easy things when we are engaged in our “bettering?”  And really, how do you define healthy?  And what is actually considered easy?

Too many questions.

Honestly, who knows!  I love that we went with Better Good Things in place of Healthier or Easier because it just means that we can make it whatever the heck we need it to be that month.  Whenever we want for that matter as we’ve so proved a good 10+ days late.

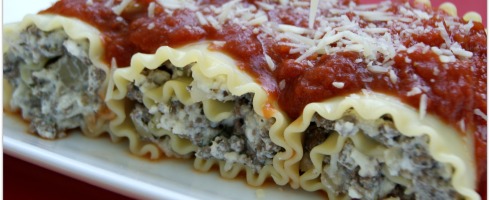
As luck would have it, this month better means both healthier and easier in my book.  I created lasagna rolls that make portioning easy (hooray!) and that cut back on the fat while upping the protein ante with cottage cheese in place of obscene amounts of ricotta and mozz as well as bison in the place of beef.  It’s pretty amazing, it packs well for lunch, and it can be frozen in the pre-bake stage for later use.

To make matters even better on my end, this became the only non-bland pre-race meal my husband could stand in the week leading up to Boston so we have dubbed them Marathon Lasagna Rolls.  They will definitely keep their place on our pre-race menu from here on out!

Looking for Evin’s lasagna take?  Standardized testing for elementary students really sucks, so she hasn’t gotten around to it because cheering her son through an unnecessarily stressful testing situation is way more important than getting creative with lasagna noodles.  Everyone say a prayer, light a candle, or rake your Zen garden for The Boy over at Food Good Laundry Bad as he braves the testing gauntlet!  When she’s got hers up I’ll update and share the link.


*UPDATED*  Evin rocked this month with Slow Cooker Lasagna which she claims is “not a recipe.”  Part recipe, part how-to, it’s 100% genius and definitely an idea that I’m glad to have in my arsenal for busy days!


#BetterGoodThings: Marathon Lasagna Rolls- a healthier and easier lasagna with bison and cottage cheese

Gimme a break- Rolled up pasta isn’t inherently gorgeous… but it is really yummy!

Marathon Lasagna Rolls

  • 1 small onion, diced
  • 2 cloves garlic, minced
  • 1 tbs dried parsley flakes
  • 1 tbs dried oregano
  • 1 tbs dried basil
  • 1 1/2 tsp dried marjoram
  • 1 lb ground bison
  • 12-15 lasagna noodles
  • 10 oz ricotta
  • 2/3 cup small curd cottage cheese
  • 2/3 cup shredded mozzarella
  • 1/4 cup grated parmesan
  • 1 jar organic marinara
  • salt and pepper
  • olive oil

Directions: Heat 1 tbs of oil over medium heat.  Saute the onion and cloves until soft and fragrant.  Add the bison to the pan.  Over medium/medium-high heat, break up bison into large pieces.  Add spices and cook through, breaking up into small pieces as you cook.  Season with additional salt and pepper as desired while browning meat.  Set aside.

Bring a pot of water to boil.  Add lasagna noodles, along with a dollop of olive oil, and boil for about 6 minutes.  Drain.

In a large bowl, combine ricotta, cottage cheese, shredded mozzarella, grated parmesan, and the ground bison mixture.

Grease a 9×13 baking dish with olive oil.

Working with one lasagna noodle at a time, lay out each noodle and spread with a generous 2 tbs of filling.  Roll up and place in baking dish.  Once baking dish is full, top lasagna rolls with sauce and cover with foil.

Bake at 400 for 30 min.

To freeze in individual portions: Follow the recipe directions through assembly but instead of preparing it in a 9×13 baking dish, spread them out on a cookie sheet to flash freeze them. Once they are mostly frozen (30 minutes to 1 hour), place them into freezer bags and freeze. When serving, place your preferred number of frozen lasagna rolls in a baking dish and top with sauce. Put foil over baking dish and bake at 350 for 60 minutes, or until heated through. The time will vary based on number of rolls.

Homemade Oat and Seed Granola

9 Apr Homemade Oat and Seed Granola with oats, salba, chia, pepitas, and flax

As I recently filled you in, I’m on a mission right now to keep The Hubs feeling full while watching his race weight as we continue the countdown to Boston.  This task is far more difficult than one might expect; on one hand he is the most relentlessly driven, self-disciplined person I’ve ever met, yet on the other- as soon as it’s territory he doesn’t have to dominate (read: any and all of the choices on the food he consumes)- he very willingly relinquishes all control.  Don’t read into this as a complaint, I take great pride in the fact that such a capable, intelligent person would entrust his diet to me fully.  It does mean that I have a very important job.

It also mean that my phone features a constant feed of questions about what he can and cant eat.  Which is pretty adorable:

text collage

A donut? Are you serious?

See… adorable.

In order to keep Mr. Adorable away from the donuts on the road to Boston, I try to send a variety of tasty, wholesome snacks along each day to help keep him feeling satisfied.  Granola is the absolute easiest option since it can be consumed a variety of ways- dry as trail mix, sprinkled over yogurt or cottage cheese, layered over sliced bananas and fruit, or in a bowl with alt-milk and a spoon.

For me, granola is one of those foods it makes me sick to think of purchasing because the store bought versions are A) infuriatingly expensive in comparison to their raw ingredients and prep effort level, B) normally contain lots of unnecessary salt and refined sugar, and C) are always lacking just a little something that would make it exactly what you wanted… but that you could easily make at home in the perfect, custom manner.

Chances are, you have the basic raw ingredients hanging out in your pantry just waiting to be used.  See what I mean:

  • 2 cups whole rolled oats
  • 1/2-3/4 cup nuts, coarsely chopped
  • 1/4-1/2 cup seeds
  • 1/3 cup dried fruit (coarsely chopped if using apples or apricots)
  • 1/2 tsp of sea salt or kelp flakes
  • 4-6 tbs of honey or maple syrup
  • 2 tbs of coconut oil

From there you can get fancy with a pinch of this or a dash of that, but in the end it’s really all the same.  It ends up being a great way to use up odds and ends in the pantry- which is far more eco-friendly and budget conscious than buying store bought.

Granola making (and consuming) rarely looks the same way twice in this household, but I do have a favorite framework I like to work around that includes lots of fabulous seeds and other little nuggets of scrumptious goodness.  Give it a go in your kitchen, but don’t be afraid to change it up to your liking.  And- MOST IMPORTANTLY- don’t turn it into something that necessitates a trip to the grocery store… use up what you’ve got in that pantry.

Unless, of course, you aren’t yet someone who stocks oats, seeds, and grade B maple syrup. In that case, get thee to the market PRONTO!


Homemade Oat and Seed Granola with oats, salba, chia, pepitas, and flax

Homemade Oat and Seed Granola

  • 2 cups whole rolled oats
  • generous 1/2 cup raw almond, coarsely chopped
  • 1/4 cup pepitas
  • 2 tbs salba
  • 2 tbs black chia seeds
  • 2 tbs quinoa (raw)
  • 2 tbs golden flax seeds
  • 2 tbs shredded, unsweetened coconut
  • 1/3 cup dried cherries
  • 1/2 tsp kelp flakes
  • 1/2 tsp cinnamon
  • 4 tbs grade B maple syrup
  • 2 tsp local honey
  • 2 tbs coconut oil, melted
  • slash of vanilla extract
  • splash of almond extract
  • generous pinch of sea salt

Directions: Preheat oven to 300 degrees F.

Combine all ingredients in a mixing bowl and, using a silicone spatula, toss well to incorporate.  Spread on a baking sheet lined with parchment paper.

Bake for 15 minutes.  Remove from oven, toss, and return to bake for 10-15 minutes more.

Allow to cool completely on baking pan before serving of storing.

*Frequency of tossing during cooking as well as length of cooling time will affect the size of your granola clusters.  If you like chunkier granola, toss less and allow to cool completely undisturbed.

Will keep in airtight container for about 2 weeks in fridge.

Homemade Gummy Hearts

26 Jan Homemade Gummy Hearts- sugar free and packed with fresh fruit from Go Running, Mama!

Homemade Gummy Hearts- sugar free and packed with fresh fruit from Go Running, Mama!

We’ve got a toddler in the household, so our home runs on the currency of stickers, kale chips, and fruit snacks.  The Hubs hates stickers.  They end up on everything and are a beast to peel off of the tile after he unknowingly grinds them in place on the way out the door for his 5 am run.  I have fingernails, so stickers aren’t my adversary.  I, on the other hand, am opposed to fruit snacks.  Even the organic, naturally flavored ones are just concentrated nuggets of sugar- and that’s not even visiting the food dyes and preservatives in  the supermarket variety.  (Why are these things called “fruit snacks” anyways?  Let’s be real.  Actual fruit- fresh or dried- should be called “fruit snacks” and everything else should be correctly labeled as gummy treats.)  But Baby Bird love both stickers and fruits snacks, so there aren’t getting eliminated- we just needed to find a way to make them better!  Happily, I discovered this homemade gummy bear recipe from Taralyn over at Undressed Skeleton and was eager to give it a try.

Since Baby Bird loves Valentine’s Day and we are on a heart shaped treats kick at our house (check out our amazingly healthy heart shaped cherry kale pops), I though it would be fun to make little gummy hearts that we could also use as better snacking options to give to friends in place of the go-to red dye 40 laden store bought treats (I’ve totally got my good friend Evin and her struggles with food dyes on the mind).  We stayed pretty true to Taralyn’s recipe and the results were fabulous- sugar free gummy treats packed with fresh fruit!

We had lots of great local citrus on hand thanks to our CSA box, and it was nice to intimately know the source of our ingredients!  We had lots of oranges, Meyer lemons, and lovely key limes so I opted for a citrus medley for the strawberry snacks (1/2 cup orange juice, 1/4 cup key lime, 1/4 Meyer lemon) that would be delightfully tart next to the banana snacks (made with a bit of orange juice) with would naturally be very sweet.

Homemade Gummy Hearts- sugar free and packed with fresh fruit from Go Running, Mama!

The process is insanely simple- simmer the fruit, juice, and -in the case of the strawberry snacks- local honey until very soft.  We opted for local honey in place of the stevia in Taralyn’s recipe for two reasons: a) anything to help with Cedar Fever in the ATX, and b) the jury is still out on stevia in this household.

The simmer process was slightly longer with the strawberries than the bananas, of course.

Homemade Gummy Hearts- sugar free and packed with fresh fruit from Go Running, Mama!

Once the fruit is softened, you pop the mixture into a blender and puree until smooth.  Remove the blender cap to allow the mixture to cool slightly and then add the gelatin and process in the blender once again.

Homemade Gummy Hearts- sugar free and packed with fresh fruit from Go Running, Mama!

Pour the mixture into a pan and pop into the fridge to cool for an hour.  The size of the pan you use for cooling with dictate the width of your gummy treats.  I didn’t want ours to turn out too thin, so I chose containers that would give us thicker treats.  The strawberry recipe also makes roughly double the treats of the banana which I feel is an ideal balance of tart to sweet when tossed together!  Baby Bird strongly prefers the strawberry citrus flavor as she tends to enjoy more complex flavor profiles in her foods.

Homemade Gummy Hearts- sugar free and packed with fresh fruit from Go Running, Mama!

For nice tiny hearts, I used a fondant cutter to cut our shapes.  Once you cut the shape, you have to give it a little jiggle to detach it from the bottom of the pan and it will lift up easily as you remove the cutter.

Homemade Gummy Hearts- sugar free and packed with fresh fruit from Go Running, Mama!

Needless to say, they were a huge it!  It was tough to snatch pictures of them before they disappeared.  Baby Bird figured I had momentarily lost my mind because I was allowing fruit snack consumption without even the slightest frown on my face and she was determined to exploit what she assumed was a lapse in judgement as long as possible.

The simmer process was slightly longer with the strawberries than the bananas, of course.

The texture is nice a firm- far more similar to an actual gummy bear than a jello jiggler- which is awesome.  Before we tried these, I was a little afraid that they would be more like amped up jigglers.  They have also given me high hopes that I can tweak this recipe to make homemade energy gels for our long runs.  Heck, if I can figure that out I may be able to add another distance race to my schedule from all the savings!

Now if I can only figure out how to make homemade stickers that don’t require Mommy’s nails or a putty knife to remove them from the tile…

Homemade Gummy Hearts- sugar free and packed with fresh fruit from Go Running, Mama!

Strawberry Citrus Gummy Hearts

Ingredients

  • 1 cup fresh citrus juice (at least 1/2 cup orange juice + additional citrus juice of your choosing to create 1 cup)
  • 2 cups diced strawberries
  • 1 tbs local honey
  • 5 packets of unflavored gelatin

Directions: Combine juice, fruit, and honey in a small pan and bring to a simmer.  Simmer until strawberries are very soft.

Pour mixture into blender and puree until smooth.  Remove lid from blender and allow to cool for 5 minutes.  Once slightly cooled, add gelatin packets and process in blender once more.

Pour into a pan (the size of the pan you select with affect the thickness of your gummy treats- I chose 8×8) and place in fridge to set for at least one hour.

Remove from refrigerator and cut into shapes.

Makes 200+ gummy hearts (will vary based on size of pan and size of shapes)

Banana Gummy Hearts

Ingredients

  • 2 ripe bananas
  • 1/4 cup freshly squeezed orange juice
  • 2 packets of unflavored gelatin

Directions:

Combine juice and banana in a small bowl.  Mash banana with a fork and stir to combine with juice.  Add mixture to a small pan to simmer for 3-5 minutes until banana is very soft and slightly golden in color.

Pour mixture into blender and puree until smooth.  Remove lid from blender and allow to cool for 5 minutes.  Once slightly cooled, add gelatin packets and process in blender once more.

Pour into a pan (the size of the pan you select with affect the thickness of your gummy treats- I chose 8×8) and place in fridge to set for at least one hour.

Remove from refrigerator and cut into shapes.

Makes 75+ gummy hearts (will vary based on size of pan and size of shapes)

*These can easily be toted as lunch bag or diaper bag snacks, but since these are made with fresh fruit and no preservatives, store in the fridge until you pack them up to send as a treat.

Breakfast on the Run: Baked Egg Cups To Go

15 Jan

The The Hub’s new Team Rogue schedule is a bit of a game changer in our household (not just because they’ve lead him to finally accepting that he has insanely loud feet).  He’s now out the door for the day pre-workout instead of our old routine in which he ran the neighborhood/area, came home to eat breakfast and get ready for work, and then left for the day.  Because it was routine, I found this slightly easier in my mind because the dirty laundry made it in the bathroom immediately and I could worry with his morning nutrition on the spot.  In reality, I’m realizing that it made me less strategic- and also meant The Hubs often made his own eggs while balancing a business call if and when I managed a morning run for myself.  We’re multi-taskers ’round here, y’all!

I’m realizing that pre-prepped breakfast to go is a thing of beauty.  It forces me to be strategic and also means I don’t feel like a lazy bum on the mornings that I sleep in a bit later than I meant… because I was up later than intended… because I took extra time to stop and smell the roses with the little one during the day… (You see the cycle right?)

Last week I created Mango Recovery Muffins for The Hubs to tote along for breakfast and this week I’ve added baked egg cups into the mix.  They are easy enough that you could bake them the morning of if you prefer, but I’m streamlining our morning shenanigans (read as: I’m not waking up at 4:15 am for someone’s track practice until it’s because I have to get up to drive Baby Bird to the track) so I’m baking them the night before and packaging them up neatly for the next morning.

Breakfast on the Run: Bake Egg Cups, fruit skewers, Mango Macadamia Recovery Muffins, and Raspberry Refrigerator Jam from Go Running, Mama!

As you can see- via the beauty that is my late night Instagram snapshot- The Hubs left this morning with two baked egg cups, fruit skewers, a Mango Macadamia Recovery Muffin, and a generous scoop of raspberry chia refrigerator jam.  The kiwi blueberry skewers made it easy for him to eat his fruit quickly without having to use utensils or picking up each piece with his fingers.  A little box of balanced, satisfying, premade nutrition designed for him to consume quickly in the transition from workout to work.

Now that is a productive start to the day!

Baked Egg Cups To Go

Ingredients

  • 2-4 jumbo eggs
  • i slice of thick cut bacon; cooked, fattiest part removed, and diced
  • truffle salt
  • butcher’s cut pepper
  • olive oil

Directions: Preheat the oven to 350 degrees F.

“Grease” silicone muffin cups with olive oil.  Place muffin cups on a baking pan or sheet.

Crack an egg into each muffin cup.  Sprinkle each egg with diced bacon, truffle salt, and pepper.

Place baking sheet and muffin cups in oven and bake for 16-19 minutes, rotating pan each 6 minutes.  Remove when eggs are white and yolks still have a slight wobble.

Top 13 in 2013

2 Jan My 5 Favorite Posts of 2013- Go Running, Mama!

This blog has been a new adventure for me and, even though it only covered the second half of the year, I thought it would be interesting to take a look back at my 13 most popular posts of 2013.

It’s been a lot of fun sharing, and I’m excited about another year with y’all!

Top 13 posts in 2013- Go Running, Mama!

13. Exhaustion, Smoothie Pick Me Ups, and a Virtual Half Marathon Comedy of Errors (September)- Forgetting water during a high altitude half marathon, finding out I had mono, and the smoothies that got me through the ordeal!

12. Carrot Top Tacos (July)- Spiced carrots and beans with carrot top chimichurri.  Never, ever waste your carrot tops again.

11. Maple Bacon Biscuits (September)-  Maple.  Bacon. Biscuit.  Trifecta.

10. Gifts from the Heart: Apple Cinnamon Ornaments (December)- An ultra non-toxic clay that makes heavenly scented ornaments or an amazing material for sensory play.

9.  #FirstontheFirst Spiced Pumpkin Cake with Penuche Frosting (October)- We were supposed to make candy, but I cheated and frosted a very yummy cake with this praline-esque frosting.

8. #FirstontheFirst Gateau Larsson (September)- My Scandinavian twist on a traditional Basque dessert.

7.  Gifts from the Heart: Baking Soda Clay Ornaments (December)- These smooth ornaments are an inexpensive (and toddler friendly) alternative to a trip to a ceramics studio.

6. Creamy Garlic Kefir Pasta (July)- A probiotic packed easy meal.

5. Cinnamon Quinoa Lunchbox Bars (August)- Lunchbox snacks don’t get much healthier.

4. Meeska… Mooska… Mouseka Cakes: Zucchini Quinoa Lunchbox Patties (August)- Healthy food tastes even better in Mickey Mouse form.

3. #FirstontheFirst Candy Canes for Cheaters (December)- Once again, we were supposed to make candy.  And I didn’t.  But I think you’ll forgive me when you taste these cookies.

2. Frosty the Cheese Man: Snowman Cheese Ball with Hand Cut Tortilla Chips (December)- The most adorable, toddler friendly appetizer you’ll ever bring to a gathering.

1. Gifts from the Heart: Homemade Ornaments– Salt dough ornaments are a classic go-to holiday activity.

Looking for even more fun?  Here are my five favorite posts you may have missed this year…

My 5 Favorite Posts of 2013- Go Running, Mama!

Get to Know Your Grains: Quinoa (Cinnamon Quinoa Lunchbox Bars)

12 Aug Go Running, Mama!- Cinnamon Quinoa Lunchbox Bars; clean, healthy snack or breakfast on the go

About eight years ago I was exposed to quinoa at Walt Disney World while staying at Animal Kingdom Lodge.  Boma, the African buffet restaurant on property, served a hot quinoa breakfast porridge every morning and even without knowing its nutritional prowress I found it to be a delightfully tasty alternative to normal breakfast cereals.  I knew I just had to have it as a morning meal option in my own home.  Anyone who has been to WDW knows that they do customer service right so when I asked about how it was prepared, the chef provided me with the preparation method and recipe.

When I returned home, I did a little research on this mystery grain and quickly learned that it was quite the super grain.  Along with preparing quinoa in the mornings I started seeking out other ways to enjoy it.  At that point I was living in Houston and the fabulous Monica Pop would sell a red quinoa salad (that I have often tried to copy, yet have never managed to get quite right) at the T’afia farmers market that became a common staple for me.  I also started making a quinoa and flax granola occasionally that- looking back- seemed very forward thinking despite the fact that my friends made fun of me for taking time to home make a seedy little granola.  It’s probably one of the biggest contributors to my crunchy hippie reputation amongst my NFL dance friends.

By now I think most everyone is familiar with quinoa and has used it at least once in their kitchen- even if it’s simply been in place of rice as a side dish.  And however you might use it, you’re doing your health some serious favors.  Nutritional evaluations of quinoa lead most dietitians to classify it as a complete protein.  It’s high in antioxidants, phytonutrients and the flavonoids quercetin and kaempherol- higher, in fact, than the celebrated cranberry.  It contains eight essential amino acids yet is low in fat.  It is gluten free.  It’s easy to prepare and store for midweek meals.  No wonder it’s considered the “Mother Grain.”

To be frank, practically the only way you can go wrong with quinoa is to pronounce it phonetically.  Stop with the “kwin-oh-uh”… it pronounced “Keen-wah.”

Say it with me- “Keeeeeen-waaaah.”

Now go eat some!

Nutritional Information (1/2 c prepared quinoa)-

  • Calories- 111
  • Total Fat- 4 g
  • Sodium- 7 mg
  • Carbohydrates- 19.5 g
  • Fiber- 2.5 g
  • Protein- 4 g
  • Vitamin E- .6 mg
  • Thiamin- .1 mg
  • Riboflavin- .1 mg
  • Niacin- .4 mg
  • Vitamin B6- .1 mg
  • Folate- 37.5 mcg
  • Calcium- 16 mg
  • Iron- 1.4 mg
  • Magnesium- 59 mg
  • Phosphorus- 140.5 mg
  • Zinc- 1 mg

Go Running, Mama!- Cinnamon Quinoa Lunchbox Bars; clean, healthy snack or breakfast on the go

These are perfect for my toddler’s snack during dance camp because they pack a protein punch!  If you’re making them for adults, up the flavor factor by tossing in some additional baking spices.  You can also toss in raisins to make them more similar to traditional granola bars for bigger kiddos.

Cinnamon Quinoa Lunchbox Bars

  • 2 1/2 c quinoa, prepared and at room temperature
  • 2 eggs
  • 2 tbs flax meal
  • 6 tbs water
  • 1/3 c almond milk (I’m crazy for Califia Farms)
  • 1/3 c grade B maple syrup
  • 1 tbs local honey
  • 1 tbs cinnamon (ceylon is the best bet for use in this quantity)
  • 1 tsp vanilla extract
  • pinch of salt

Directions: Preheat oven to 370 degrees F.

Line an 8×8 baking dish with parchment paper.

In a small mise en place bowl, mix flax meal with water and allow to congeal.

In a mixing bowl, whisk eggs and flax meal mixture.  Reserving quinoa, add remaining ingredients and whisk once again.

Add quinoa and mix well to combine.

Pour into parchment lined baking dish and bake for 25 minutes.

Allow to cool 10 minutes in pan before removing on parchment to a cooling rack.

Once completely cool, cut in  a 2 inch grid to create 16 bars.

Meeska… Mooska… Mouseka-Cakes: Zucchini Quinoa Lunchbox Patties

5 Aug Go Running, Mama!- Zucchini Quinoa Lunchbox Patties; easy, healthy, make ahead meals in fun character shapes

Sunday morning, I woke up feeling icky!  As can be expected when you have a toddler in the house, Baby Bird sensed this and decided to wake up extra early while Daddy was our for his long run and swim.  She pampered me with lots of hugs and kisses- which I adore from my sweet girl- but she also wanted my undivided attention directed towards making character voices for all of her Mickey Mouse Clubhouse character dolls.  Not exactly a relaxing moment of recovery.  Though caffeine is normally avoided in our household, caffeine made a welcome appearance as I did my very best Goofy impersonation waiting for Daddy to make it home.

Go Running, Mama!

I do my best to be a super healthy gal, but sometimes this happens.

Since there is no such thing as a mama sick day, I knew I wasn’t going to get tons of rest which meant I needed to try to buy myself some time wherever possible.  On top of that, I wanted to attempt to stay in my home in my yoga shorts, sweatshirt, compression socks, and totally-not-of-the-moment-for-a-30-plus-year-old-mother messy bun barring medical emergency or fire.

One problem- I needed to go to the grocery store.  Aside from a major run on the market last week for end of the season peaches, I hadn’t purchased much produce lately as I was working through what he had in the fridge.  I also haven’t gotten a CSA order in a few weeks since we have been in and out of town.  And, thanks to feeling icky, I forgot to confirm this week’s Monday order so I wont start my week off with a rescue box of goodies.

Even if I had remembered to confirm my order I still would have been in a jam because Baby Bird has Mickey Mouse Dance Camp this week thus a yummy lunch that is both toddler friendly and toddler manageable must be packed for 5 days.

So my choices were a) go to the store b) make it work and get creative in the kitchen.

I’m sure someone is looking at that and thinking “hmmm… isn’t ‘c) send your husband to the store’ an option?”

In short- no.

No, it’s not an option.  My husband is very helpful.  He is very kind.  He will shop for every item on our list.  But he will also call me about each item as though I must guide him to the exact location for each and every thing like I’m the world’s only grocery Onstar.  He is a perfectionist and wants to bring home exactly what I needed.  But when I’m feeling bleh- done is better than perfect, so that was a no-go.  Plus, his weekend time is far better spent loving on Baby Bird than going Whole Foods Orienteering.

Don’t fret!  There’s a little something you should know about Jenn- cooking is almost like breathing to me.  Seriously… if I haven’t cooked something recently it’s possible that I’m dead.  Running, dancing, and cooking are cathartic experiences for me and since we don’t have a treadmill or a dance room at our house, a good deal of home time is spent in the kitchen having fun.  And anyways, this past Thanksgiving when I was so sick with the “super flu” that I could barely stand up I managed to rally and cook a 5 course meal (in aseptic technique a la the science lab teacher I used to be) that I couldn’t even eat so feeling icky is just a minor bump when it comes to food action.  I may train for marathons on the pavement, but I also train for moments like this in my kitchen.  Trust me- there are at as many miles on my Kitchenaid stand mixer as there are on my most recent three pairs of Adidas Bostons combined!

But I digress.  Back to the challenge at hand…

The produce situation was abysmal.  There were some berries (score for lunch bag snacks!) and TWO ZUCCHINI left over from the previous evening’s zucchini pie.  That’s it for fresh and seasonal.  Sad.

Luckily, last week my sweet friend Laura and I were chatting about the big hits in our toddlers’ dining repertoire as we waited for our girls in toddler yoga and she happened to mention that her little one could always be counted on to eat quinoa patties.  Quinoa patties are awesome because they are an easy “disposal” food for any leftover chopped veggies you have on hand as well as an ideal vehicle in which to hide nutrient dense greens that can sometimes be a struggle for picky eaters. Plus they freeze really well.  I had totally forgotten about how great and easy they were and made a mental note to make some for Baby Bird soon.

Go Running, Mama!

Baby Bird still hasn’t quite grasped the hand placement for bridge!

Since we always have a plethora of quinoa on hand, soon became Sunday as I knew they would pack will in a toddler lunch and require no utensils.  Quinoa patties were a perfect fit for some grated zucchini and they also gave me the opportunity to use up some leftover black beans and corn kernels from last Friday night’s Southwestern pizza.

I made a little more quinoa than I needed for the patties as well so I could whip up a batch of Cinnamon Quinoa Lunchbox Bars that could pack easily for snack time at camp as well as make an easy breakfast if I wasn’t in tip top shape by morning.

Instead of the usual round patties, I went for a Mickey Mouse shape.  How fun will that be for Baby Bird when she eats her Mouseka-lunch at Mouseka-camp!?

The quinoa patty experience reminded me one of one of the biggest encouragements for starting this blog- remembering all the things I’ve done that I feel are worth repeating!  On that note… thanks for virtually hanging out with me and helping to clear my never ending case of Mommy-brain.

Enjoy!

Go Running, Mama!- Zucchini Quinoa Lunchbox Patties; easy, healthy, make ahead meals in fun character shapes

Zucchini Quinoa Lunchbox Patties

  • 1 1/2 c quinoa, prepared and cooled to room temperature (about 1/2 c quinoa cooked in 1 1/2 c water or stock)
  • 1 medium zucchini
  • 1 garlic clove, sliced thinly
  • 1/2 c diced onion
  • 1/2 corn kernels (I used frozen- defrosted)
  • 1/3 c black beans
  • 1 egg
  • 1 tbs flax meal
  • 2 tbs water
  • 1 tbs chives, finely chopped
  • 1 tsp prepared dijon mustard
  • 1 tbs olive oil
  • 2 tbs all-purpose flour
  • salt and pepper to taste

Directions: Preheat oven to 400 degrees F.

Position a box grater over a kitchen towel. Grate the zucchini onto the towel.  Gather the shredded zucchini in the towel and wring over the sink to remove excess liquid.

In a small mise en place bowl, mix flax meal and water and allow to congeal.

Heat olive oil in saute pan over medium high heat.  Add onion and garlic and saute until translucent.  Add corn, beans, and shredded zucchini and season with salt and pepper.  Toss to incorporate and remove pan from heat to cool.

In a mixing bowl, lightly beat the egg.  Add flax meal mixture, flour, and chives and beat once more to incorporate.  Add the quinoa to the egg mixture. and mix.  Turn the zucchini mixture onto a cutting board and roughly chop before adding to the egg mixture.  Mix well to combine.

Go Running, Mama!- Zucchini Quinoa Lunchbox Patties; easy, healthy, make ahead meal

Spoon mix into cookie cutter

Line a baking sheet with parchment paper.  Using a cookie cutter (Our Mickey Mouse cutter encompasses the combined area of a 3.5 inch biscuit cutter, so if you are making these for adults a round cookie cutter about 3.5 inched in diameter will work perfectly!) spoon the mixture into the cookie cutter until it fills the cutter halfway.  Gently slide the cookie cutter off of the patty and repeat, making sure to space them out enough that you can flip them halfway through cooking with a spatula without disturbing the shape.

Go Running, Mama!- Zucchini Quinoa Lunchbox Patties; easy, healthy, make ahead meals in fun character shapes

Remove cookie cutter carefully to maintain shape

Bake for 15 minutes.  Remove from oven to flip and then bake for another 15 minutes, rotating the pan when you return it to the oven.

Makes about 16 patties (8 servings)

Question for y’all: Does anyone else have a great, easy tried and true recipe you wish you didn’t frequently “forget?”

Unjunked Blueberry “Pep” Tarts with Coconut-Macadamia Nut Butter and Maple Glaze

17 Jul Go Running Mama- Unjunked Blueberry "Pep" Tart with Coconut-Macadamia Nut Butter and Maple Glaze

When it comes to planning to ensure our nutritional needs are met in this household, I deal with considerable inner conflict- As an active mom with an equally active husband and daughter I want to live by my inborn desire to graph, chart, and color coordinate our weekly menu guaranteeing all our nutritional needs are fully met and no food will go to waste:  As a hippie momster locavore foodie I want to live only by what’s freshest and most exciting, ingredients that speak to me at a moments notice or flavor combinations that engage my senses most fully when they are accidental discoveries.  Though it would probably be easiest on my sanity if I took a hardline stance and invested fully in only nurturing my type-A side, the hippie drippy lala in me seems to be guiding our family palate this summer to enjoy what the universe is offering at a moments notice.  Happily, I’m learning that the universe is just as opposed to wasting food as serious Jenn.  I’m also learning that the universe has some killer ideas about snacking awesomeness!

While in WIlliams Sonoma recently, I stumbled upon a Toaster Pastry Press that was on sale for $2.50.  No, I didn’t put the decimal in the wrong place- that is actually $2.50!  Obviously the universe was insisting I purchase that press because A) I love embarking on fun food adventures that my toddler can join in as well, and B) anytime anything is marked down to $2.50 in Williams Sonoma you would be completely crazy not to purchase it!  I set it aside knowing it would be just perfect for a rainy day kitchen adventure sometime.

Fast forward to the past 48 hours in Austin where, tut tut, it’s looked like rain (hint one…).  The arrival of our weekly CSA box provided a most welcomed diversion for a homebound toddler who was delighted to discover a pint of local blueberries inside.  “These are good for making!” she declared (hint two…).  As I started running through recipes in my mind to see what clever, toddler-friendly item I could conjure I remembered the local whole wheat flour we had received last week and the super duper exciting pastry press.  Okay, Universe… I give in!  Toaster pastries it is!

Go Running Mama- Unjunked Blueberry "Pep" Tart with Coconut-Macadamia Nut Butter and Maple Glaze

My little one has never had a pop-tart-esque pastry before, so I didn’t really have to “compete” with a familiar comfort item but I’m not one to try to duplicate icky food by making more nutritious versions of ickiness.  What’s the point of that?  It just disappoints those who find the original comforting and doesn’t add anything to the party for those who want a really tasty snack instead of a copycat of bland and dissatisfying comfort food.  My daughter is a big fan of graham crackers, so I decided to tweak our homemade graham cracker recipe for the dough.

Go Running Mama- Unjunked Blueberry "Pep" Tart with Coconut-Macadamia Nut Butter and Maple Glaze

We obviously had to use the blueberries for the filling, so I whipped up the same honey-sweetened reduction I use for homemade fruit yogurt.  I also remembered I had some leftover coconut-macadamia nut butter I made this weekend to serve dolloped on top of a tropical fruit salad that would make a lovely addition.

The end result?  Totally stellar yumminess brushed with maple syrup.  I’m not sure there will be any left for breakfast!

My daughter is obsessed.  As she frantically signed “more” to me, her mouth filled with the final bite of her pastry, I made the mistake of colling them Pop Tarts.

“More Pep Tart, peeeease,” she pleaded.

More Pep Tarts it is, Dear.

Go Running Mama- Unjunked Blueberry "Pep" Tart with Coconut-Macadamia Nut Butter and Maple Glaze

Unjunked Blueberry “Pep” Tarts with Coconut-Macadamia Nut Butter and Maple Glaze

  • Coconut-Macadamia Nut Butter (recipe below)
  • 1 1/2 c blueberries
  • 3 tbs local honey
  • 2 tbs water
  • 1/2 tsp almond extract
  • 3 1/3 c whole wheat flour
  • 1/3 c wheat germ
  • 1 scant tsp coarse salt
  • 4 tbs grade B maple syrup
  • 2 tbs almond milk
  • 8 tbs olive oil
  • 3 tsp vanilla
  • 3/4 tsp cinnamon

To make blueberry filling:

In a small saucepan, heat blueberries, honey, water, and almond extract over medium-high heat and bring to boil. Stir frequently and simmer to reduce by half using a wooden spoon to crush berries that do not pop on their own.  Reduce heat to medium if necessary.  Once reduced, remove pan from heat to thicken.

To make pastry dough:

Add flour, wheat germ, salt, and cinnamon to a mixing bowl and whisk to incorporate.   In a separate bowl, combine maple syrup, almond milk, olive oil, and vanilla.  Mix well to combine.  Make a well in the dry ingredients.  Pour the wet ingredients into the dry ingredients and mix until well combined.  Mixture will be crumbly.  Turn out onto a baking pan lined with parchment and roll dough into a rectangle to cover baking sheet about 1/8 inch thick.  Chill at least 30 minutes.

To assemble “pep” tarts:

Preheat oven to 350 degrees F.

If using a toaster pastry press, cut dough according to press instructions.  If using a pastry or pizza wheel, cut dough into 3×4 inch rectangles.  In the center of every other square, place 1 1/2 tsp coconut-macadamia nut butter and 1 1/2 tsp of blueberry filling.  Cover with dough and crimp edges with pastry press or fork tines.  Chill for at least 10 minutes.

Bake in oven for 14-16 minutes.  Using a pastry brush, glaze each pastry with grade B maple syrup immediately after removing pan from the oven.  Allow to cool on pan for five minutes before transferring to cooling rack.

Makes 6 pastries

Coconut-Macadamia Nut Butter

  • 4 c shredded coconut
  • 2/3 c raw macadamia nuts
  • 1 tbs grade B maple syrup
  • coconut oil (to suit personal texture preference)

Directions: Add first three ingredients to food processor and process for 10 minutes.  Scrape sides of bowl and check consistency of butter (should be similar to nut butter, although slightly drier).  Continue to process if needed.  Add coconut oil by the teaspoon is texture and consistency is to dry for your liking and you desire more spreadability at room temperature.  Store in an airtight jar.

My Smoothie Plus Juice Revelation

10 Jul Go Running Mama- Routines

As the stay at home mama of a toddler (and a former classroom teacher), I’m a big fan of streamlined routines.  After all, any place I can save a little time and effort means even more time for family adventures or physical activity.

Go Running Mama- Routines

I make prep time count to save time- Cherries are pitted immediately; half are frozen for smoothies, the others make easy snacks!

Morning routine is one of those places where efficiency is a necessity- we have two adults who need to get in training runs and showers and a toddler to dress while I tackle lunches, snack boxes, and smoothies and juice to make before we usher Daddy out the door on the way to work and I snag the little to make it to the dance studio or park playtime.

Even a little tweak here and there, as insignificant as it may seem, gives us a happy cushion in our domestic rush hour, but finding these areas for adjustment is rare.  However this morning I experienced a happy accident that is destined to become a beautiful second saver in our morning routine… I was out of coconut water!

Coconut water is a staple in our household, so I’m still not exactly sure how this happened nor how I overlooked the gaping hole in our pantry normally filled by carton after carton of the good stuff.  I’d like to blame Daddy for drinking the last carton and not alerting me, but that would be ridiculous given that I reorganized the fridge and pantry less than 48 hours ago and failed to notice the lack of coconut water in both locations.  Regardless of how it happened, at 8 am this morning I found myself without a drop of coconut water.

I made our juice for the morning- a super fab mix of cucumber, celery, parsley, kale, spinach, and apple- and started pulling out our smoothie staples when I realized my predicament- plain kefir, raw oats, freshly pitted cherries frozen (an abomination to many, I realize, but freezing them means I don’t have to add ice to the smoothies to thicken them up), coconut oil, kelp flakes, macadamia nuts, grade B maple syrup, cinnamon… and no coconut water!

For a moment I was dumbfounded.  What’s a mama to do?  Without any liquid it would be too thick, water would make it taste watery, and I didn’t love the idea of adding more dairy.  But then it hit me… add the juice!  Woohoo!

I held my breath and gave it a try.  Not only were the texture and flavor fabulous, but combining the two will save me the time of gathering, cleaning, and prepping an extra Lifefactory glass bottle for each family on a daily basis which buys several delicious minutes every morning.  Plus, I have a great new smoothie to add to our repertoire!

Go Running Mama- Revelation Smoothie

Revelation Smoothie

  • 6 oz plain kefir
  • 10 oz fresh green juice
  • 1/2 cup raw old fashioned oats
  • 2 tbsp coconut oil
  • 1 1/2 cups frozen cherries
  • 1/3 c macadamia nuts
  • 1/2 tsp kelp flakes
  • 1 tbsp grade B maple syrup
  • cinnamon to taste

Directions: Add ingredients to blender in the order listed.  Blend on high until smooth.

Serves: 2 adults and a toddler