Tag Archives: grade B maple syrup

Watermelon Salad with Avocado, Feta, Mint and Pomegranate Dressing

2 Jun Watermelon Salad with Avocado, Feta, Mint and Pomegranate Dressing

Whew!  The blog has been silent for quite sometime, but I have a good excuse…

We packed up Baby Bird for her first international jaunt to Paris and Ireland (Yes, I realize that it sound weird to list a city and then a country as separate destinations, but I figured it was easer than listing every town we visited in Ireland!) where we all ate entirely too much bread and cheese for 15 days.  But we ran it off…

The Hubs on a morning Paris run

The Hubs on a morning Paris run

The Hubs completely dominating The Cliffs of Moher

The Hubs completely dominating The Cliffs of Moher

International travel even has a way of making ME look like a competent runner

A little run through The Burren- International travel even has a way of making ME look like a competent runner

So I guess we sort of had baguette immunity since we were running.  That’s a thing, right?

We’ve only been home a few days- we are currently struggling to get a toddler back on the correct time zone… YIKES!- and I’m trying to keep things simple, so when we got an invite to a friends house for dinner* I went with my very favorite, super simple summer combo of watermelon and feta for our addition to the fete.  Just to be fancy, I jazzed it up with avocado, mint, and a pomegranate simple syrup that were still all very easy but felt slightly elevated.

To be clear, this is the salad that will accompany me to all gatherings in the next few months.  So if you invite us over, don’t you add this to your menu and then expect me to arrive with a berry crostada embellished to look like the American flag.  You’ve been warned!

Okay, okay… if you ask really nicely, I’ll still show up with a patriotic dessert.

But you better have plenty of watermelon salad!


*If you invite people over for dinner after they’ve been out of town with a toddler for awhile, you are totally awesome.  Chances are anyone traveling with kids is exhausted and looking for any excuse to not have to cook a meal at home… and then clean it up!

Watermelon Salad with Avocado, Feta, Mint and Pomegranate Dressing

Watermelon Salad with Avocado, Feta, Mint, and Pomegranate Dressing

  • about 1 lb watermelon, cut into 1/2 inch cubes
  • 2 avocados, cubed
  • 6 oz solid feta, cut into 1/4 inch cubes
  • 2 sprigs of fresh mint
  • 1 cup unsweetened, pure pomegranate juice
  • 1/4 cup organic sugar
  • 1/4 cup maple syrup

In a small saucepan, bring pomegranate juice, sugar, and maple syrup to a simmer and reduce to form a thin simple syrup.  Set aside in a container to cool.

Layer watermelon, avocado, and feta in a large serving bowl.

Pick the mint leaves from the springs and chiffonade.  Sprinkle leaves across the top of the feta layer.

Serve with dressing on the side (the most attractive presentation) or toss with simple syrup dressing just before serving.


Homemade Oat and Seed Granola

9 Apr Homemade Oat and Seed Granola with oats, salba, chia, pepitas, and flax

As I recently filled you in, I’m on a mission right now to keep The Hubs feeling full while watching his race weight as we continue the countdown to Boston.  This task is far more difficult than one might expect; on one hand he is the most relentlessly driven, self-disciplined person I’ve ever met, yet on the other- as soon as it’s territory he doesn’t have to dominate (read: any and all of the choices on the food he consumes)- he very willingly relinquishes all control.  Don’t read into this as a complaint, I take great pride in the fact that such a capable, intelligent person would entrust his diet to me fully.  It does mean that I have a very important job.

It also mean that my phone features a constant feed of questions about what he can and cant eat.  Which is pretty adorable:

text collage

A donut? Are you serious?

See… adorable.

In order to keep Mr. Adorable away from the donuts on the road to Boston, I try to send a variety of tasty, wholesome snacks along each day to help keep him feeling satisfied.  Granola is the absolute easiest option since it can be consumed a variety of ways- dry as trail mix, sprinkled over yogurt or cottage cheese, layered over sliced bananas and fruit, or in a bowl with alt-milk and a spoon.

For me, granola is one of those foods it makes me sick to think of purchasing because the store bought versions are A) infuriatingly expensive in comparison to their raw ingredients and prep effort level, B) normally contain lots of unnecessary salt and refined sugar, and C) are always lacking just a little something that would make it exactly what you wanted… but that you could easily make at home in the perfect, custom manner.

Chances are, you have the basic raw ingredients hanging out in your pantry just waiting to be used.  See what I mean:

  • 2 cups whole rolled oats
  • 1/2-3/4 cup nuts, coarsely chopped
  • 1/4-1/2 cup seeds
  • 1/3 cup dried fruit (coarsely chopped if using apples or apricots)
  • 1/2 tsp of sea salt or kelp flakes
  • 4-6 tbs of honey or maple syrup
  • 2 tbs of coconut oil

From there you can get fancy with a pinch of this or a dash of that, but in the end it’s really all the same.  It ends up being a great way to use up odds and ends in the pantry- which is far more eco-friendly and budget conscious than buying store bought.

Granola making (and consuming) rarely looks the same way twice in this household, but I do have a favorite framework I like to work around that includes lots of fabulous seeds and other little nuggets of scrumptious goodness.  Give it a go in your kitchen, but don’t be afraid to change it up to your liking.  And- MOST IMPORTANTLY- don’t turn it into something that necessitates a trip to the grocery store… use up what you’ve got in that pantry.

Unless, of course, you aren’t yet someone who stocks oats, seeds, and grade B maple syrup. In that case, get thee to the market PRONTO!


Homemade Oat and Seed Granola with oats, salba, chia, pepitas, and flax

Homemade Oat and Seed Granola

  • 2 cups whole rolled oats
  • generous 1/2 cup raw almond, coarsely chopped
  • 1/4 cup pepitas
  • 2 tbs salba
  • 2 tbs black chia seeds
  • 2 tbs quinoa (raw)
  • 2 tbs golden flax seeds
  • 2 tbs shredded, unsweetened coconut
  • 1/3 cup dried cherries
  • 1/2 tsp kelp flakes
  • 1/2 tsp cinnamon
  • 4 tbs grade B maple syrup
  • 2 tsp local honey
  • 2 tbs coconut oil, melted
  • slash of vanilla extract
  • splash of almond extract
  • generous pinch of sea salt

Directions: Preheat oven to 300 degrees F.

Combine all ingredients in a mixing bowl and, using a silicone spatula, toss well to incorporate.  Spread on a baking sheet lined with parchment paper.

Bake for 15 minutes.  Remove from oven, toss, and return to bake for 10-15 minutes more.

Allow to cool completely on baking pan before serving of storing.

*Frequency of tossing during cooking as well as length of cooling time will affect the size of your granola clusters.  If you like chunkier granola, toss less and allow to cool completely undisturbed.

Will keep in airtight container for about 2 weeks in fridge.

Mango Macadamia Recovery Muffins with Raspberry Chia Jam

14 Jan

Mango Macadamia Recovery Muffins with Raspberry Chia Jam- Go Running, Mama!

These muffins were born of the need to provide The Hubs with a homemade “recovery” food that was portable for his early morning runs.  I can make a batch, toss them in the freezer, and pull one or two out each evening for him to take with his very portable breakfast. The jam only has to be made once a week and a generous scoop in a small Wean Green container makes are great muffin accompaniment.

I needed an easy, freezable non bacon and eggs protein option for The Hubs to easily reach for in transit post workout since I keep having to stress over and over and over and over that he needs to start consuming protein within the first half hours after a hard workout (which, given the fact that I’ve spent countless hours ensuring this is the best nutritional plan for him, means that I will soon discover is completely incorrect in the next major nutrition paradigm shift). These muffins pack in a little extra protein and TONS of nutrients thanks to the addition of both Vega protein and Amazing Meal.  I love the chia jam as an addition (Thanks to Family Circle for this idea… OMG.  That statement really drives home the fact that I’m a middle aged mom.)  because it assists with hydration and provides a hefty does of Omega-3s.

Most importantly… they are darn tasty.

No more morning excuses.  Put the PopTarts down.

Mango Macadamia Recovery Muffins with Raspberry Chia Jam- Go Running, Mama!

Mango Macadamia Recovery Muffins

Ingredients:

  • 1 cup frozen mango, coarsely chopped
  • 2 egg whites, lightly beaten
  • 1/3 cup grade B maple syrup
  • 3/4 cup vanilla rice milk
  • 1/4 cup coconut oil, melted
  • 1/3 cup raw macadamia nuts, coarsely chopped
  • 30 g Vega Sport Vanilla Performance Protein
  • 30 g Amazing Meal Pomegranate Mango Infusion
  • 1 1/2 cups wheat bran
  • generous 1/2 cup rolled oats
  • 3 1/3 tsp baking soda

Directions: Preheat oven to 375 degrees F.

Combine egg whites, maple syrup, and rice milk in a bowl and mix well to combine.

Add rolled oats to a food processor and pulse to create a fine textured oat flour.

Combine oat flour, wheat bran, baking soda, Amazing Meal, and protein to a large mixing bowl and whisk to combine well.  Make a well in the center and add wet ingredient mixture; mix to combine.  Add mango and macadamia nuts and mix well once more.  Gently stir in the coconut oil.

Line a 12 well muffin tray with baking cups.  Fill each well almost to the top.  Bake for 20 minutes.

Remove from oven to a cooling rack.  Cool in muffin tray for at least 10 minutes before removing liners from the tray directly to the cooling rack.

Cool completely before enjoying.

Raspberry Chia Refrigerator Jam

Ingredients

  • 3 cups frozen raspberries
  • 1/3 cup grade B maple syrup
  • 1/4 cup chia seeds
  • 1 tbs lemon juice

Directions:

Combine raspberries, maple syrup, and lemon juice in a medium sauce pan.  Heat over medium heat for about 5 minutes until raspberries are defrosted and beginning to cook down very slightly.

Stir in chia seeds.  Continue to cook over medium low heat for 8-15 minutes until thickened and and slightly gelatinous (the consistency is a judgement call here).

Remove from heat and cool to room temperature.  Store in a tightly sealing jar in the refrigerator for up to a week.

Top 13 in 2013

2 Jan My 5 Favorite Posts of 2013- Go Running, Mama!

This blog has been a new adventure for me and, even though it only covered the second half of the year, I thought it would be interesting to take a look back at my 13 most popular posts of 2013.

It’s been a lot of fun sharing, and I’m excited about another year with y’all!

Top 13 posts in 2013- Go Running, Mama!

13. Exhaustion, Smoothie Pick Me Ups, and a Virtual Half Marathon Comedy of Errors (September)- Forgetting water during a high altitude half marathon, finding out I had mono, and the smoothies that got me through the ordeal!

12. Carrot Top Tacos (July)- Spiced carrots and beans with carrot top chimichurri.  Never, ever waste your carrot tops again.

11. Maple Bacon Biscuits (September)-  Maple.  Bacon. Biscuit.  Trifecta.

10. Gifts from the Heart: Apple Cinnamon Ornaments (December)- An ultra non-toxic clay that makes heavenly scented ornaments or an amazing material for sensory play.

9.  #FirstontheFirst Spiced Pumpkin Cake with Penuche Frosting (October)- We were supposed to make candy, but I cheated and frosted a very yummy cake with this praline-esque frosting.

8. #FirstontheFirst Gateau Larsson (September)- My Scandinavian twist on a traditional Basque dessert.

7.  Gifts from the Heart: Baking Soda Clay Ornaments (December)- These smooth ornaments are an inexpensive (and toddler friendly) alternative to a trip to a ceramics studio.

6. Creamy Garlic Kefir Pasta (July)- A probiotic packed easy meal.

5. Cinnamon Quinoa Lunchbox Bars (August)- Lunchbox snacks don’t get much healthier.

4. Meeska… Mooska… Mouseka Cakes: Zucchini Quinoa Lunchbox Patties (August)- Healthy food tastes even better in Mickey Mouse form.

3. #FirstontheFirst Candy Canes for Cheaters (December)- Once again, we were supposed to make candy.  And I didn’t.  But I think you’ll forgive me when you taste these cookies.

2. Frosty the Cheese Man: Snowman Cheese Ball with Hand Cut Tortilla Chips (December)- The most adorable, toddler friendly appetizer you’ll ever bring to a gathering.

1. Gifts from the Heart: Homemade Ornaments– Salt dough ornaments are a classic go-to holiday activity.

Looking for even more fun?  Here are my five favorite posts you may have missed this year…

My 5 Favorite Posts of 2013- Go Running, Mama!

Long Run Breakfast: Maple Walnut Kefir Biscuits and Fruit Salad

30 Dec Maple Walnut Kefir Biscuits- Go Running, Mama!

Hey, Jenn… remember when you stated a blog and called it ‘Go Running, Mama!’ because you spent all of your ‘me’ time running?  Remember that? Do you think you should… I don’t know… actually talk about running again sometime soon!?

Fair point, Inner Dialogue. Very fair point.

Except I haven’t been running consistently since the summer because the second half of 2013 has been a bit of a comedy of errors for me.

So what’s a mother runner on hiatus to do?  Post about my husband’s runs.  Obviously.  It’s smoke and mirrors, y’all… just enough to get myself back into training mode (which is happening TODAY) so that you forget that you read the last 10 posts and thought “She should have called this blog ‘Go Make Ornaments and Cookies, Mama!'”  It’s all a clever ruse.

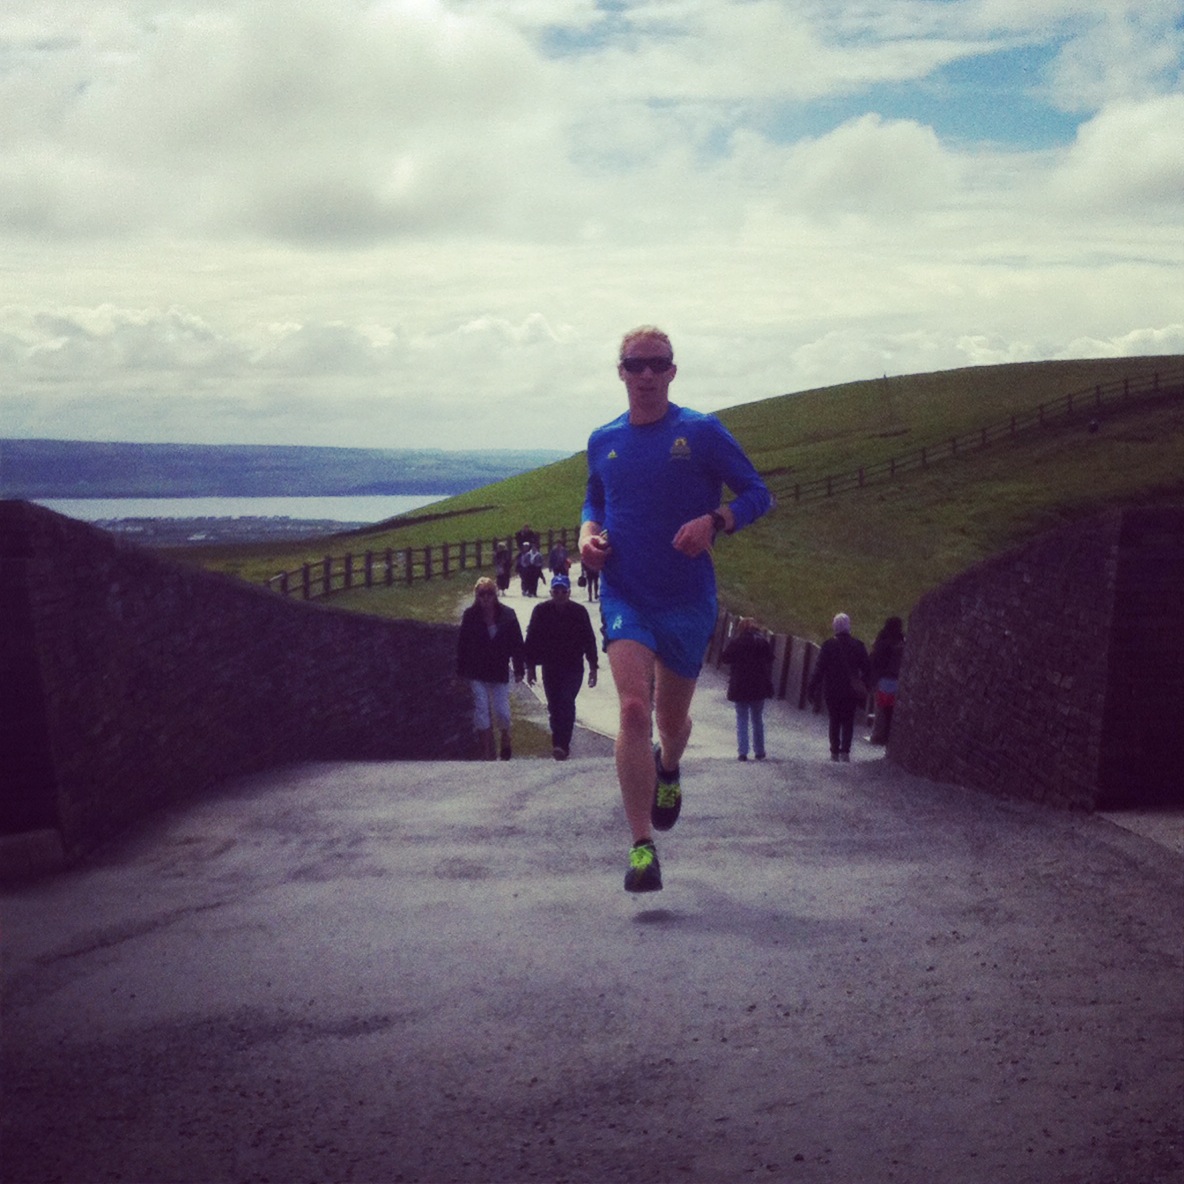
This weekend The Hubs had his first long run with the Team Rogue Sisson crew.  We’ve both been working with an amazing coach, Leah Soro at Enlightened Performance, for a almost two years (I like to describe myself very officially as the most infuriating runner Leah has ever had to coach) and she has pushed The Hubs to a level of excellence… not to mention the miracles she always works with me in the inevitably short period in which I focus before each race and claim I’m going to be consistently dedicated forever and ever from that point on (Spoiler Alert: I never follow through on that promise).

The only thing that is lacking with one-to-one coaching is teammates.  For me, this is is fine- I need someone who is going to help me work around toddler illness and playdates, late nights and nap boycotts, and who understands that workouts change based on whether or not I might need to push a stroller that day (Hill repeats?  During a week filled with freezing rain? With a toddler in a jogger?  It’s great to be able to send a text to Leah and get some different direction); when I need a running buddy I toss mine in the stroller; and there are no shortage of ladies I know willing to run my pace during a race.  I need the world’s most flexible way to be a coached runner- which Leah has patiently and graciously provided for me.

The man of the house is different.  If it’s on his plan, he will do it.  If there is a blizzard he will still do it, and he will probably do it better and faster than you asked him to perform.  And then he will come home and do double the conditioning exercises you asked him to do, a focused yin yoga series and foam rolling, and commence to quiz me on his appropriate nutrient intake based on that specific workout given our current elevation and a slight fluctuation in his temperature and heart rate.  And then he’ll do 100 burpees because he’s been standing still for too long.  So he’s a little serious.

In his less than three years as a runner he has made major strides, much of that with Leah’s guidance.  Joining Team Rogue is going to give him a new edge- the ability to push himself to the performance level of even faster athletes.  Peer pressure at its finest.  I don’t know if you can tell, but he’s not the kind of guy who likes to be left behind.

The Team Rogue Sisson crew was scheduled to run 20 miles on Saturday.  The Hubs is coming back from a calf injury so he said he thought he’d run 15 or 16.  I know him, so I figured that meant he would run a 10 mile warm up at 4:30 am and then decide to run the full 20 with Rogue as well.  Judging by his extreme focus and determination when laying out his gear on Friday night, the odds seemed in my favor.  30 miler, anyone?

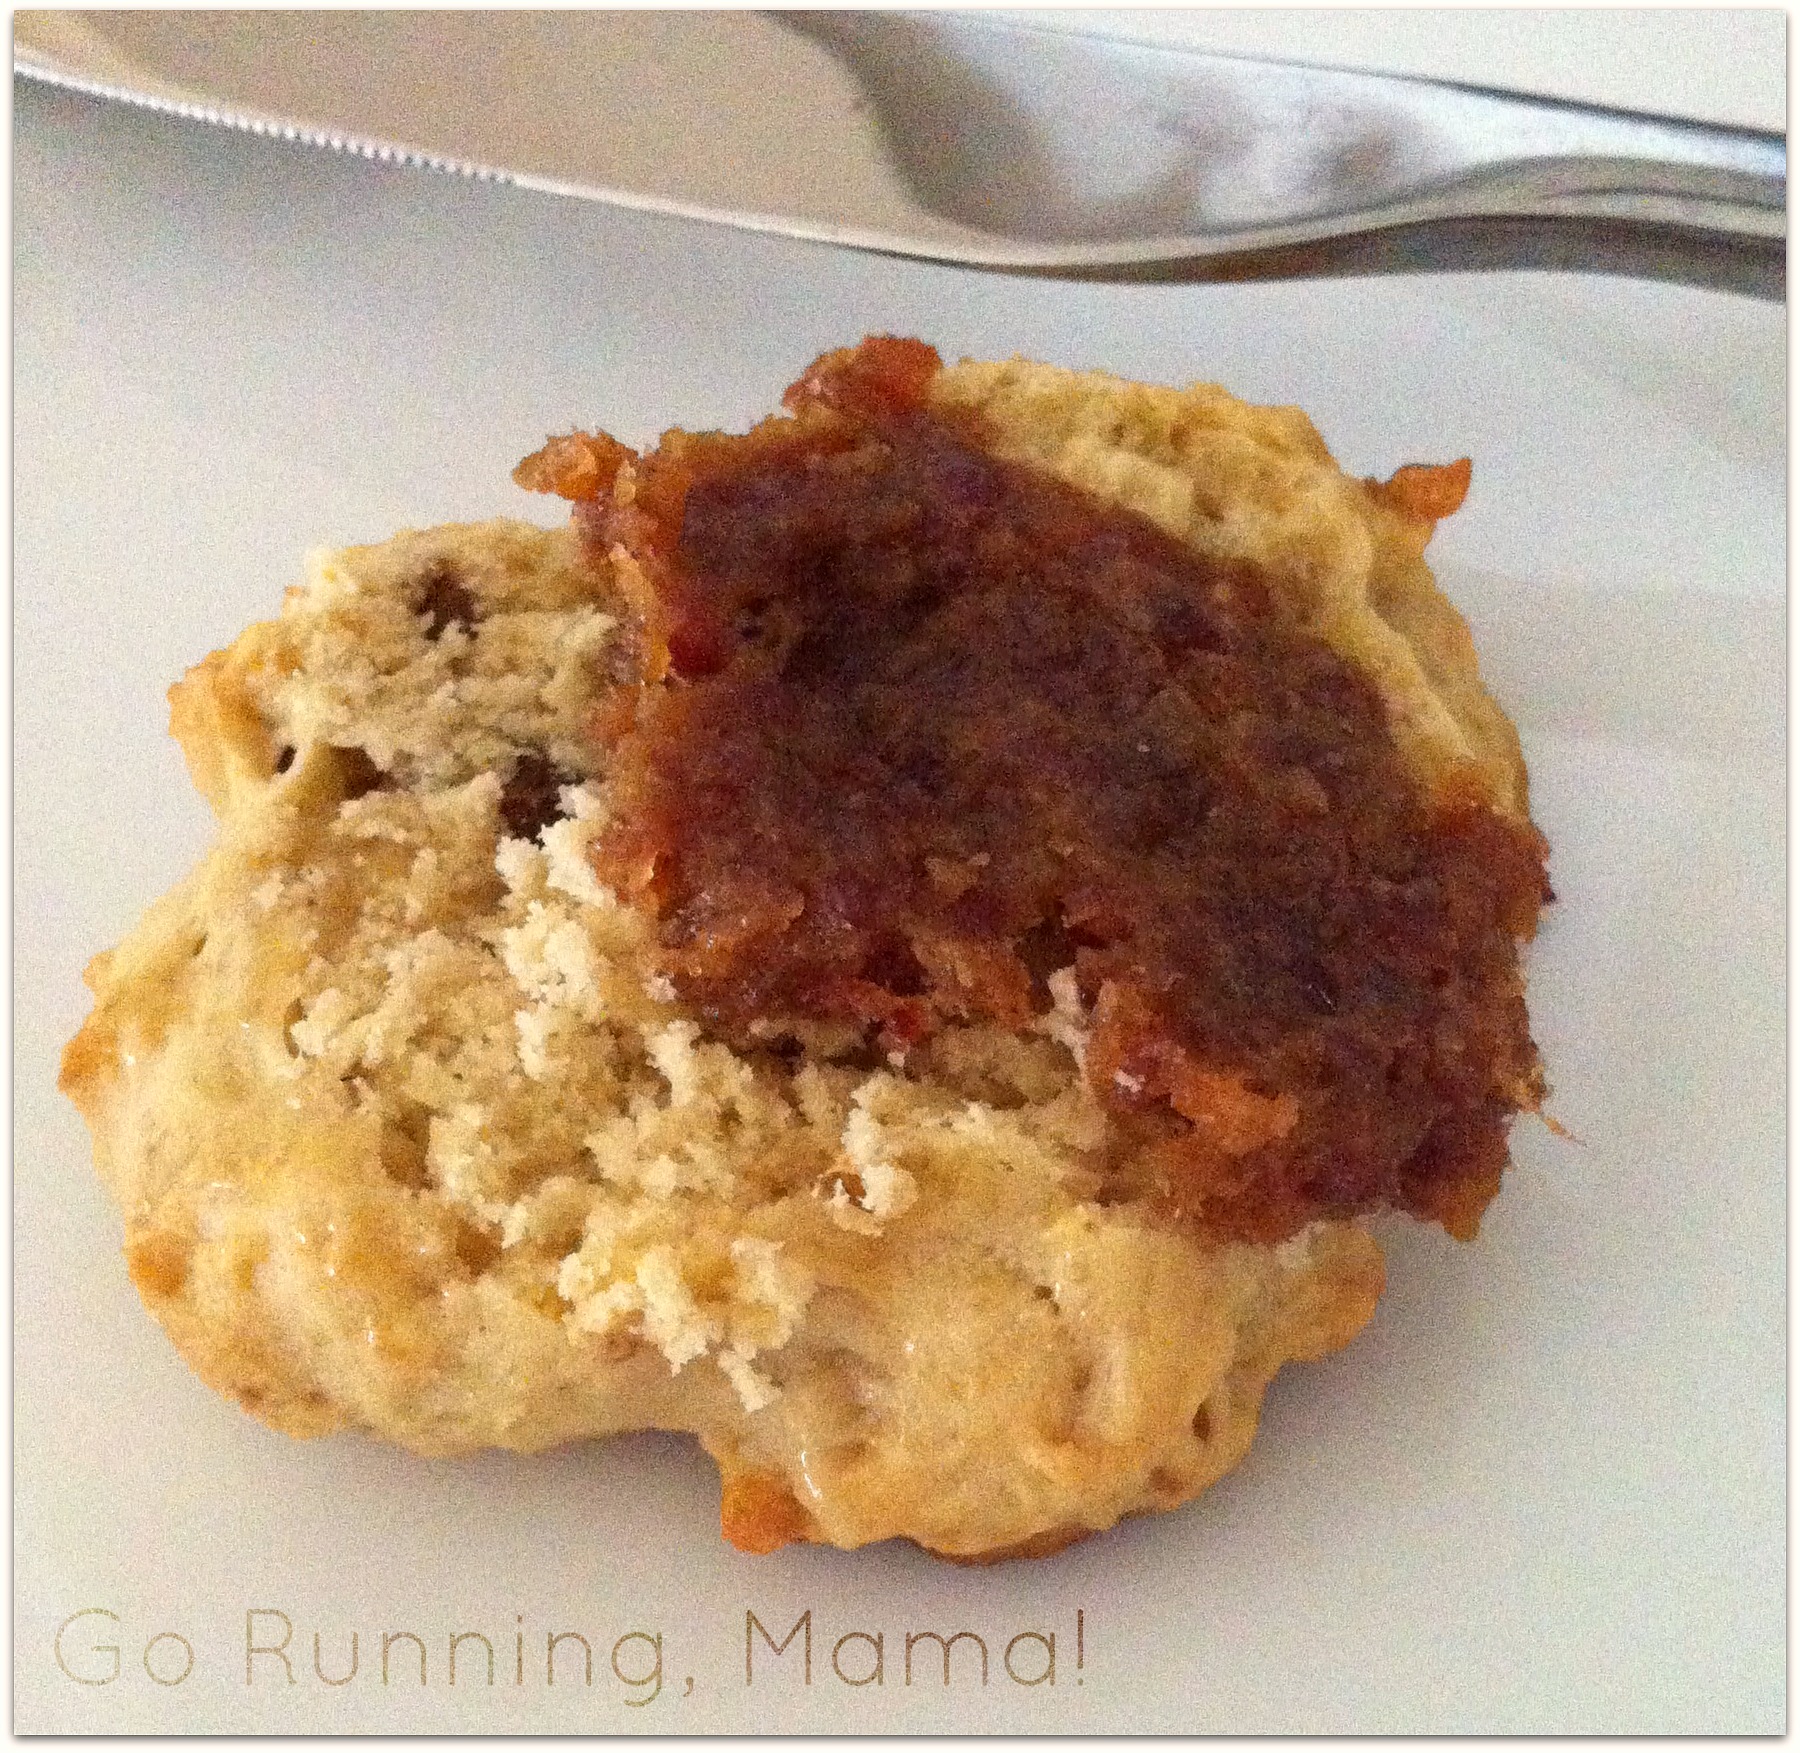
Big training events are celebration points at our house, so Baby Bird and I decided to make a big breakfast for Daddy.  After a long run, he needs around 20 grams of protein and ideally we aim for around a 3:1 carb to protein ratio for his meal 30 minutes after his run.  Though I knew he would come home and immediately ask for bacon and eggs, I wanted to back off of the cholesterol and rely on healthier fats.  I decided on scrambled eggs, fruit salad,and maple walnut kefir biscuits.

Maple Walnut Kefir Biscuits- Go Running, Mama!

Our scrambled eggs are eggs with just a pinch or salt, butcher cut pepper, with a little olive or grapeseed oil in the pan- no extra daily mixed in.  (Last year we did an elimination diet in which we discovered The Hubs performs better when he avoids uncultured dairy) We mixed up a fruit salad with berries (high in antioxidants), bananas (potassium), mint (abundant in nutrients such as vitamin A and iron), and avocado.  In addition to the abundance of healthy monounsaturated fats contained in avocados, they also help to slow down the flow of glucose to your cells so they provide a bit of a balance to the high sugar content in fruit salads (especially if they contain high glucose fruits like grapes, date, bananas, or oranges).

Maple Walnut Kefir Biscuits were born of my love for all things drop-biscuit married to the prolific use of walnuts, grade B maple syrup, and kefir in my kitchen.  We are seriously obsessed with kefir.  I often use it as a substitute for sour cream, creme fraiche, or yogurt when cooking.  It’s a great probiotic addition to smoothies and make a really simple pasta sauce.  Plus, it’s about as toddler friendly as probiotics get.  Lifeway Probugs have been a game changer for us, Baby Bird thinks they are the greatest dessert in the world.  When she saw that Lifeway had a booth at ACL Kiddie Limits this year and were giving away free Probugs push pops, she declared it the coolest event in the universe.  She is still talking about how much she loves ACL.

Maple Walnut Kefir Biscuits- Go Running, Mama!

A maple walnut biscuit should clearly be a sweet biscuit.  Using maple syrup in the biscuits lets me cut down considerably on the sugar content, and using grade b maple syrup lets me use even less maple syrup in the sugar’s place without sacrificing sweetness or mapleyness.  Glazing the biscuits with grade B maple syrup packs an extra punch of manganese and zinc for a guy who is sufficiently sweating out huge quantities of salts and minerals on a daily basis.  Walnuts are high in omega-3s but, more importantly, research shows they may have significant cardiovascular benefits.  And a healthy heart is a very good thing for an endurance athlete.

When The Hubs returned home from his run (20 miles… underachiever) he was in great spirits and very much in need of a post run meal.  Once he hit the entryway, I heard the expected question… “Can we have some bacon?”

The answer was yes… a little… spread sparingly on a walnut kefir biscuit (in the form of bacon beer jam) and enjoyed with fruit and eggs.

Maple Walnut Kefir Biscuits and Bacon Beer Jam- Go Running, Mama!

That was an acceptable compromise.

We all sat down to enjoy a recap of that morning’s run over a fabulous breakfast.  And admire the sweet new Adidas Glide Boosts he purchased at Rogue after his run.

And, of course, to enjoy a little family core work and yin yoga.  And to discuss the carb to protein ratio in the exact breakfast portions The Hubs had just consumed.

Some things never change.

Maple Walnut Kefir Biscuits- Go Running, Mama!

Maple Walnut Kefir Biscuits

Ingredients:

  • 1/4 cup unsalted cultured butter (slightly softened)
  • 1/4 cup packed brown sugar
  • 1 egg
  • 2 tbs grade B maple syrup + more for glazing biscuits
  • 1/4 cup plain kefir
  • 1 1/2 cups all purpose flour
  • 1/4 tsp baking soda
  • 1/4 tsp sea salt
  • generous 1/2 cup chopped walnuts

Directions:  Preheat oven to 375 degrees F.

Combine butter, sugar and egg in the bowl of a stand mixer and cream.  Add the maple syrup and kefir and mix well.

In a separate bowl, combine the flour, salt and baking soda and whisk well to incorporate.

Gradually add the dry ingredients to the wet, mixing until just combined.  Gently stir in the walnuts.

Drop rounded tablespoons of dough onto a baking sheet lined in parchment paper.  Bake for 12 minutes until biscuits are beginning to brown slightly.

Remove to a cooling rack and brush biscuits with maple syrup to glaze.

Make 12-14 biscuits.

Gifts in Jars: Bacon Beer Jam and Spicy Gingerbread Syrup

28 Dec Bacon Beer Jam- Go Running, Mama!

Let me just lead off with this- I know this doesn’t help anyone with their holiday gift giving since Christmas is now over.  Sorry about that!  In the few days leading up to the Christmas, I was far too busy finishing off gifts for friends and family to type anything up- I just figured I’d blog our food gift recipes from this holiday season sometime in January and queue them up to post next winter when I had time to take a few proper pictures and people had homemade gifts on the brain once again.  (I can’t even begin to imagine how awesome it might feel to be 10 months ahead!)

Flatteringly enough though, I’ve gotten quite a few requests from friends wanting the recipes for the gifts I made this year and it’s far easier to share them here than via email so I I’ve decided to neglect my dreams of preplanned posts in the spirit of kitchen collegiality.

This year I made a bacon beer jam adapted from a Martha Stewart recipe.  Her’s uses bourbon, but I modified it for our our kitchen using bourbon barrel aged beer (specifically Rahr & Sons Bourbon Barrel Aged Winter Warmer from Fort Worth, Texas y’all!) with spectacularly amazing results.

Bacon Beer Jam- Go Running, Mama!

Because who doesn’t love great bacon and amazing beer?  That you can spread on a warm biscuit.

Bacon Beer Jam- Go Running, Mama!

Shockingly, some people don’t love bacon and beer… even when spread on a warm biscuit.

And some of them are really great people with whom I am dear friends… which meant I had to have another homemade gift option this year.  Since the arrival of the Nespresso machine my amazing husband gifted me during my bout with mono, I’ve become a bit of a latte devotee so I decided to also make homemade Spicy Gingerbread Syrup- thin for my fellow latte drinkers and thicker for my non-coffee friends to use on desserts or pancakes.  The best part is that it is super easy and uses ingredients you already have in your pantry!

Bacon Beer Jam- Go Running, Mama!

Bacon and Bourbon Barrel Aged Beer Jam

Ingredients:

  • 2 lbs sliced bacon, cut into 1-inch pieces
  • 3 cups shallots, chopped
  • 6 cloves of garlic, chopped
  • 1 1/2 tsp chili powder
  • 1 tsp ground mustard
  • 3/4 tsp ground ginger
  • 3/4 cup bourbon barrel aged beer (room temperature, poured carefully to avoid foaming)
  • 1/2 cup grade B maple syrup
  • 1/4 cup apple cider vinegar
  • 1/4 cup red wine vinegar
  • 1/2 cup brown sugar, packed

Directions: Working in three additions, spread bacon in a single layer in a large skillet and cook over medium heat until browned, stirring frequently, about 20 minutes.  Transfer to paper towels to drain.  Remove the fat and clean the pan between each addition of bacon.  After the last addition, reserve browned bits and 1 tbs fat in the pan (slightly less if your bacon had a considerably high fat content).

Add shallots and garlic to the pan and cook over medium heat until translucent, about five minutes.  Add spices and cook one minute, stirring constantly.  Increase the heat to high and add the beer and maple syrup.  Bring to a boil, scraping the bottom of the pan frequently to incorporate browned bits from bottom of the pan. Add vinegar and brown sugar and return to a boil.  Reduce heat to low and add the bacon back to the pan.  Simmer, stirring occasionally, until the liquid reduces to a thick glaze.

Transfer mixture to a food processor and pulse until it reaches your desired consistency.  Transfer to glass jars and refrigerate at least one hour before using.  Jam will keep up to four weeks in a refrigerated, tightly sealed glass jar.

Makes about five half pint jars.

Spicy Gingerbread Syrup- Go Running, Mama!

Spicy Gingerbread Syrup

Ingredients:

  • 1 1/2 cups water
  • 1 1/4 cups organic granulated sugar
  • 1 1/2 tbs ground ginger
  • 1 1/2 tsp ground cinnamon
  • 1/2 tsp ground nutmeg
  • 1/4 tsp ground clove
  • generous 1/4 tsp sea salt
  • 2 tsp pure vanilla extract

Directions: Combine all ingredients except the vanilla extract in a saucepan and bring to a boil over medium heat.  Turn down heat to a simmer and allow to thicken while simmering- 10 to 15 minutes- until it is the consistency of maple syrup. Refrain from stirring.

Once it reaches the correct consistency, turn off the heat and stir in the vanilla.  Allow to cool before pouring into a lidded jar.

Syrup will keep a few weeks in the fridge.

Makes about four half pints.

Maple Bacon Biscuits

12 Sep Go Running, Mama!: Maple Bacon Biscuits

Hi, my name is Jenn and I’m about to make your weekend breakfast awesome. Legitimately awesome. Objectively awesome.

Maybe not healthy… but awesome.

Around here, weekends are about the long run. Which also means Sundays are about the equally important “post long run breakfast.” Usually that means pancakes, but that is a serious undertaking in our household because I strongly believe the only classic pancakes worth making are those with stiffly beaten egg whites incorporated throughout which means that they are only good straight off the skillet- no pre-making, early prepping, or-gasp- freezing excess for the next weekend allowed… because that would make pancakes with beaten egg whites just terrible. Flat, mealy, gritty….Ick! And this makes me sad because pre-making, early prepping, and freezing leftovers for easy breakfasts later in the week are basically the first three bullet points on my Mommy Kitchen Creed.

Last weekend I had biscuits on the brain after receiving a heavy dose of undeserved praise the previous night for the ultra easy cheddar biscuits I toted to accompany minestrone soup at our best-running-family-freinds’ house along with some thick cut apple cinnamon smoked bacon that was a prime candidate for post long run breakfast. Bacon biscuits and scrambled eggs seemed like an obvious conclusion to reach. It took about thiry seconds to find a recipe on Joy the Baker for Brown Sugar Bacon Biscuits that was an ideal jumping off point. And Joy was onto something that makes me really happy- the combo of baconiness and sweetness.

Yep, I’m one of those cliche individuals who loves the idea of bacon and sweets… as an occasional treat, of course I love the Vogues Bacon Chocolate bar. At the donut shop, I opt for a maple bacon donut. One of my running teams has a “bacon challenge” during marathons (Endurance Sports Connection/Run Disney so I can Eat Disney shout-out!). I own both smoked bacon sugar and maple salt. Because those things make sense together. They are good- cliches, trends, and faux hipness aside.

Sweet/salty combinations are undeniably amazing. The king and queen of this regal pairing? Bacon and maple syrup.

Okay, so bacon and maple syrup it is.

I played around with the inspiration recipe just a bit in order to form my own perfect marriage of maple and bacon in biscuit. And, as I said before, it’s awesome.

Please run before you eat these- because chances are you aren’t stopping with just one!

Go Running, Mama!: Maple Bacon Biscuits

Maple Bacon Biscuits

  • 6 slices of bacon
  • 3 c all-purpose flour
  • 2.5 tbs brown sugar
  • 3 tsp baking powder
  • 1 tsp baking soda
  • 3/4 tsp salt
  • butcher’s cut pepper (very coarsely ground)
  • 3/4 c cold unsalted butter, cut into small cubes
  • 1 large egg
  • 1/4 c + 1/2 c grade B maple syrup
  • 3/4 c buttermilk

Directions: Preheat oven to 370 degrees F.

Line baking sheet with foil and spread slices of bacon into a single layer. Sprinkle with pepper and bake until crisp, 15-17 minutes.

Increase oven temperature to 425 degrees F.

Remove to layered paper towels to cool and drain. When cool to the touch, chop into medium chunks and set aside.

Add flour, sugar, salt, baking powder, baking soda, and a generous 1/2 tsp butcher’s cut pepper to the bowl on a food processor and pulse to combine. Add the cold butter and pulse until flour mixture resembles a very coarse meal and butter has broken into pea-sized chunks. Transfer to a mixing bowl.

In a small bowl, whisk together buttermilk, maple syrup, and egg. Add to four mixture and stir to incorporate, adding bacon immediately after buttermilk mixture.

Turn onto lightly floured surface and knead several times just to incorporate, being careful not to overwork dough.

Roll or at dough into 1.5 inch thickness and cut into circles using a biscuit cutter. Reshape dough to make additional biscuits with scraps, being careful not to manipulate dough to the point that the butter begins to melt (shape biscuits away from the oven!).

Place on parchment lined baking sheet and bake for 12-15 minutes.

Remove biscuits from baking sheet to a cooling rack placed over parchment and drizzle each with 1/2 tsp grade B maple syrup before serving.

Makes about two dozen biscuits.

Get to Know Your Grains: Quinoa (Cinnamon Quinoa Lunchbox Bars)

12 Aug Go Running, Mama!- Cinnamon Quinoa Lunchbox Bars; clean, healthy snack or breakfast on the go

About eight years ago I was exposed to quinoa at Walt Disney World while staying at Animal Kingdom Lodge.  Boma, the African buffet restaurant on property, served a hot quinoa breakfast porridge every morning and even without knowing its nutritional prowress I found it to be a delightfully tasty alternative to normal breakfast cereals.  I knew I just had to have it as a morning meal option in my own home.  Anyone who has been to WDW knows that they do customer service right so when I asked about how it was prepared, the chef provided me with the preparation method and recipe.

When I returned home, I did a little research on this mystery grain and quickly learned that it was quite the super grain.  Along with preparing quinoa in the mornings I started seeking out other ways to enjoy it.  At that point I was living in Houston and the fabulous Monica Pop would sell a red quinoa salad (that I have often tried to copy, yet have never managed to get quite right) at the T’afia farmers market that became a common staple for me.  I also started making a quinoa and flax granola occasionally that- looking back- seemed very forward thinking despite the fact that my friends made fun of me for taking time to home make a seedy little granola.  It’s probably one of the biggest contributors to my crunchy hippie reputation amongst my NFL dance friends.

By now I think most everyone is familiar with quinoa and has used it at least once in their kitchen- even if it’s simply been in place of rice as a side dish.  And however you might use it, you’re doing your health some serious favors.  Nutritional evaluations of quinoa lead most dietitians to classify it as a complete protein.  It’s high in antioxidants, phytonutrients and the flavonoids quercetin and kaempherol- higher, in fact, than the celebrated cranberry.  It contains eight essential amino acids yet is low in fat.  It is gluten free.  It’s easy to prepare and store for midweek meals.  No wonder it’s considered the “Mother Grain.”

To be frank, practically the only way you can go wrong with quinoa is to pronounce it phonetically.  Stop with the “kwin-oh-uh”… it pronounced “Keen-wah.”

Say it with me- “Keeeeeen-waaaah.”

Now go eat some!

Nutritional Information (1/2 c prepared quinoa)-

  • Calories- 111
  • Total Fat- 4 g
  • Sodium- 7 mg
  • Carbohydrates- 19.5 g
  • Fiber- 2.5 g
  • Protein- 4 g
  • Vitamin E- .6 mg
  • Thiamin- .1 mg
  • Riboflavin- .1 mg
  • Niacin- .4 mg
  • Vitamin B6- .1 mg
  • Folate- 37.5 mcg
  • Calcium- 16 mg
  • Iron- 1.4 mg
  • Magnesium- 59 mg
  • Phosphorus- 140.5 mg
  • Zinc- 1 mg

Go Running, Mama!- Cinnamon Quinoa Lunchbox Bars; clean, healthy snack or breakfast on the go

These are perfect for my toddler’s snack during dance camp because they pack a protein punch!  If you’re making them for adults, up the flavor factor by tossing in some additional baking spices.  You can also toss in raisins to make them more similar to traditional granola bars for bigger kiddos.

Cinnamon Quinoa Lunchbox Bars

  • 2 1/2 c quinoa, prepared and at room temperature
  • 2 eggs
  • 2 tbs flax meal
  • 6 tbs water
  • 1/3 c almond milk (I’m crazy for Califia Farms)
  • 1/3 c grade B maple syrup
  • 1 tbs local honey
  • 1 tbs cinnamon (ceylon is the best bet for use in this quantity)
  • 1 tsp vanilla extract
  • pinch of salt

Directions: Preheat oven to 370 degrees F.

Line an 8×8 baking dish with parchment paper.

In a small mise en place bowl, mix flax meal with water and allow to congeal.

In a mixing bowl, whisk eggs and flax meal mixture.  Reserving quinoa, add remaining ingredients and whisk once again.

Add quinoa and mix well to combine.

Pour into parchment lined baking dish and bake for 25 minutes.

Allow to cool 10 minutes in pan before removing on parchment to a cooling rack.

Once completely cool, cut in  a 2 inch grid to create 16 bars.

Unjunked Blueberry “Pep” Tarts with Coconut-Macadamia Nut Butter and Maple Glaze

17 Jul Go Running Mama- Unjunked Blueberry "Pep" Tart with Coconut-Macadamia Nut Butter and Maple Glaze

When it comes to planning to ensure our nutritional needs are met in this household, I deal with considerable inner conflict- As an active mom with an equally active husband and daughter I want to live by my inborn desire to graph, chart, and color coordinate our weekly menu guaranteeing all our nutritional needs are fully met and no food will go to waste:  As a hippie momster locavore foodie I want to live only by what’s freshest and most exciting, ingredients that speak to me at a moments notice or flavor combinations that engage my senses most fully when they are accidental discoveries.  Though it would probably be easiest on my sanity if I took a hardline stance and invested fully in only nurturing my type-A side, the hippie drippy lala in me seems to be guiding our family palate this summer to enjoy what the universe is offering at a moments notice.  Happily, I’m learning that the universe is just as opposed to wasting food as serious Jenn.  I’m also learning that the universe has some killer ideas about snacking awesomeness!

While in WIlliams Sonoma recently, I stumbled upon a Toaster Pastry Press that was on sale for $2.50.  No, I didn’t put the decimal in the wrong place- that is actually $2.50!  Obviously the universe was insisting I purchase that press because A) I love embarking on fun food adventures that my toddler can join in as well, and B) anytime anything is marked down to $2.50 in Williams Sonoma you would be completely crazy not to purchase it!  I set it aside knowing it would be just perfect for a rainy day kitchen adventure sometime.

Fast forward to the past 48 hours in Austin where, tut tut, it’s looked like rain (hint one…).  The arrival of our weekly CSA box provided a most welcomed diversion for a homebound toddler who was delighted to discover a pint of local blueberries inside.  “These are good for making!” she declared (hint two…).  As I started running through recipes in my mind to see what clever, toddler-friendly item I could conjure I remembered the local whole wheat flour we had received last week and the super duper exciting pastry press.  Okay, Universe… I give in!  Toaster pastries it is!

Go Running Mama- Unjunked Blueberry "Pep" Tart with Coconut-Macadamia Nut Butter and Maple Glaze

My little one has never had a pop-tart-esque pastry before, so I didn’t really have to “compete” with a familiar comfort item but I’m not one to try to duplicate icky food by making more nutritious versions of ickiness.  What’s the point of that?  It just disappoints those who find the original comforting and doesn’t add anything to the party for those who want a really tasty snack instead of a copycat of bland and dissatisfying comfort food.  My daughter is a big fan of graham crackers, so I decided to tweak our homemade graham cracker recipe for the dough.

Go Running Mama- Unjunked Blueberry "Pep" Tart with Coconut-Macadamia Nut Butter and Maple Glaze

We obviously had to use the blueberries for the filling, so I whipped up the same honey-sweetened reduction I use for homemade fruit yogurt.  I also remembered I had some leftover coconut-macadamia nut butter I made this weekend to serve dolloped on top of a tropical fruit salad that would make a lovely addition.

The end result?  Totally stellar yumminess brushed with maple syrup.  I’m not sure there will be any left for breakfast!

My daughter is obsessed.  As she frantically signed “more” to me, her mouth filled with the final bite of her pastry, I made the mistake of colling them Pop Tarts.

“More Pep Tart, peeeease,” she pleaded.

More Pep Tarts it is, Dear.

Go Running Mama- Unjunked Blueberry "Pep" Tart with Coconut-Macadamia Nut Butter and Maple Glaze

Unjunked Blueberry “Pep” Tarts with Coconut-Macadamia Nut Butter and Maple Glaze

  • Coconut-Macadamia Nut Butter (recipe below)
  • 1 1/2 c blueberries
  • 3 tbs local honey
  • 2 tbs water
  • 1/2 tsp almond extract
  • 3 1/3 c whole wheat flour
  • 1/3 c wheat germ
  • 1 scant tsp coarse salt
  • 4 tbs grade B maple syrup
  • 2 tbs almond milk
  • 8 tbs olive oil
  • 3 tsp vanilla
  • 3/4 tsp cinnamon

To make blueberry filling:

In a small saucepan, heat blueberries, honey, water, and almond extract over medium-high heat and bring to boil. Stir frequently and simmer to reduce by half using a wooden spoon to crush berries that do not pop on their own.  Reduce heat to medium if necessary.  Once reduced, remove pan from heat to thicken.

To make pastry dough:

Add flour, wheat germ, salt, and cinnamon to a mixing bowl and whisk to incorporate.   In a separate bowl, combine maple syrup, almond milk, olive oil, and vanilla.  Mix well to combine.  Make a well in the dry ingredients.  Pour the wet ingredients into the dry ingredients and mix until well combined.  Mixture will be crumbly.  Turn out onto a baking pan lined with parchment and roll dough into a rectangle to cover baking sheet about 1/8 inch thick.  Chill at least 30 minutes.

To assemble “pep” tarts:

Preheat oven to 350 degrees F.

If using a toaster pastry press, cut dough according to press instructions.  If using a pastry or pizza wheel, cut dough into 3×4 inch rectangles.  In the center of every other square, place 1 1/2 tsp coconut-macadamia nut butter and 1 1/2 tsp of blueberry filling.  Cover with dough and crimp edges with pastry press or fork tines.  Chill for at least 10 minutes.

Bake in oven for 14-16 minutes.  Using a pastry brush, glaze each pastry with grade B maple syrup immediately after removing pan from the oven.  Allow to cool on pan for five minutes before transferring to cooling rack.

Makes 6 pastries

Coconut-Macadamia Nut Butter

  • 4 c shredded coconut
  • 2/3 c raw macadamia nuts
  • 1 tbs grade B maple syrup
  • coconut oil (to suit personal texture preference)

Directions: Add first three ingredients to food processor and process for 10 minutes.  Scrape sides of bowl and check consistency of butter (should be similar to nut butter, although slightly drier).  Continue to process if needed.  Add coconut oil by the teaspoon is texture and consistency is to dry for your liking and you desire more spreadability at room temperature.  Store in an airtight jar.